|
[QODBC-Desktop] How to setup QODBC DCOM Server
Posted by Juliet (QODBC Support) on 07 April 2010 02:49 AM
|
|
|
Note: DCom component is deprecated. As an alternative to DCom, you can use QRemote. Please refer to the articles for more information:
Web Server How to build a QuickBooks IIS Web application using QODBC Driver and Microsoft ASP.NET (Video) Sample Code for Inserting InvoiceLine to existing Invoice using PHP
QuickBooks Data Remotely Using QuickBooks data remotely via QODBC. Accessing QuickBooks Data Remotely using QODBC & QRemote. (Video)
MS SQL Server How to create Link Server with MS SQL 2005/2008/2012 64-bit Using QODBC/QRemote How to create Link Server with MS SQL 2005/2008/2012 32-bit Using QODBC/QRemote Using QuickBooks data with MS SQL Server using QODBC Driver and QRemote (Video)
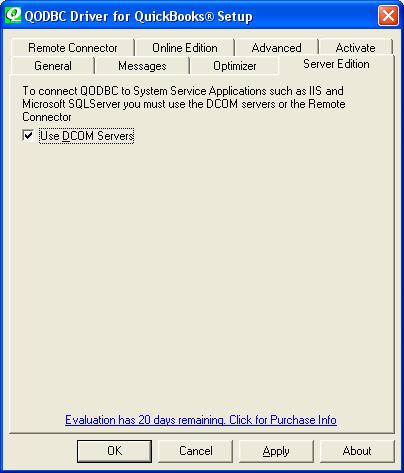
Automatic DCOM Configuration ToolThe below instructions are applicable for 32-bit Machine + 32-bit Application invoking/using QODBC and 64-bit Machine + 32-bit Application invoking/using QODBC. For 64-bit Machine and 64-bit Applications, use QRemote InstructionsYou must first turn on the use of the DCOM servers. You do this by running the QODBC Setup Screen and selecting the Server Edition tab page. Check the checkbox for Use DCOM Servers.
Note: If you're working with the QuickBooks sample company file, this option is available to check even if you do not have a Server Edition license and will be ignored if you open a standard company file and do not have a QODBC Server Edition or evaluation. Also refer : DCom Option / Server Edition Tab missing in QODBC Setup Tab Automatic DCOM Configuration ToolDownload the following automated tools by clicking here. 1. Dcpinst.exe is an installation setup for the automated DCOM configuration object. This needs to be run first and only once. 2. QODBCSetDCOM.VBS is a VB script that uses the installed configuration object to set up the DCOM Servers. It will reset and automatically add all necessary security each time it is run. The script can be edited if you need to change the Accounts it is configuring. 3. The new settings will not take effect until the DCOM servers (qbXMLRPeQODBCInteractive.exe, which is only needed for 2003 and older QuickBooks.and qbXMLRP2eQODBCInteractive.exe) are removed from memory. Rebooting is the simplest way to accomplish this, but running the Windows Task Manager and Ending Process on any copies will also work.
Manual DCOM Setup Instructions for XP Pro and Windows 2003 UsersGive the Internet Guest Account (<IUSR_<machine_name>), ASP.NET Machine Account (ASPNET), and INTERACTIVE accounts permissions to launch and access qbXMLRP2eQODBCInteractive.exe DCOM object using dcomcnfg by doing the following: Launch DCOMCNFG.EXE and Locate DCOM Config1. Launch DCOMCNFG.EXE by clicking the Start button, selecting Run, and typing "Dcomcnfg" in the Run dialog box. 2. Expand the Console Root tree to the following: Console Root -> Computers -> My Computer -> DCOM Config
Edit Permissions of qbXMLRP2eQODBCInteractiveHighlight qbXMLRP2eQODBCInteractive and select Action -> Properties from the Main menu (Or right-click menu). Then goes to the Security tab as follows: Edit Launch and Activation Permissions 1. In the Security tab, select Customize option in the Launch and Activation Permissions frame and click Edit, then add Internet Guest Account (<IUSR_<machine_name>), ASP.NET Machine Account (ASPNET), and INTERACTIVE to the Launch Permissions dialog box.
2. Press OK to save.
In case you are unable to find Internet Guest Account (<IUSR_<machine_name>), ASP.NET Machine Account (ASPNET), and INTERACTIVE,
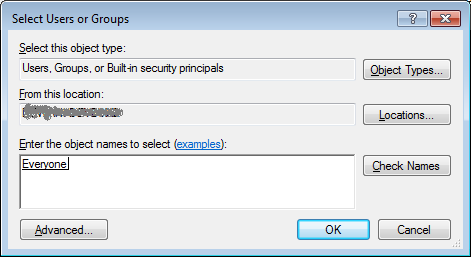
Note: in-case you are still unable to find or don't know the internal user invoking the component, you may add "Everyone" for the time being, and once you have tested the connection, you may remove the user/group "Everyone" and add the internal user to this list. Please inform your System/Network Administrator if you are adding "Everyone" to the permission list.
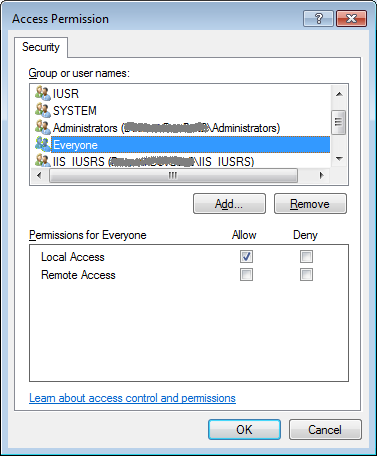
Edit Access Permissions 1. In the Security tab, select Customize option in the Access Permissions frame and click Edit, then add Internet Guest Account (<IUSR_<machine_name>), ASP.NET Machine Account (ASPNET) and INTERACTIVE to the Access Permissions dialog box.  2. Press OK to save.
In case you are unable to find Internet Guest Account (<IUSR_<machine_name>), ASP.NET Machine Account (ASPNET) and INTERACTIVE,
Note: in-case you are still unable to find or don't know the internal user invoking the component, you may add "Everyone" for the time being, and once you have tested the connection, you may remove the user/group "Everyone" and add the internal user to this list. Please inform your System/Network Administrator if you are adding "Everyone" to the permission list.
Edit Permissions of qbXMLRPeQODBCInteractiveNote: qbXMLRPeQODBCInteractive.exe is only needed for 2003 and older QuickBooks. So if you use the latest QB after 2003, you could ignore the below about qbXMLRPeQODBCInteractive.exe. Highlight qbXMLRPeQODBCInteractive and select Action -> Properties from the Main menu (Or right-click menu) just as before. Edit Launch and Activation Permissions 1. In the Security tab, select Customize in the Launch and Activation Permissions frame and click Edit, then add Internet Guest Account (<IUSR_<machine_name>), ASP.NET Machine Account (ASPNET) and INTERACTIVE to the Launch Permissions dialog box. 2. Press OK to save. Edit Access Permissions 1. In the Security tab, select Customize in the Access Permissions frame and click Edit, then add Internet Guest Account (<IUSR_<machine_name>), ASP.NET Machine Account (ASPNET) and INTERACTIVE to the Access Permissions dialog box. 2. Press OK to save. Interactive IdentityFinally, the Interactive identity: Note: For PHP (here, take it as an example) and other services, you may need to set the identity to be the launching user to get all the tests to run successfully as below: QODBC PHP DCOM Access Test Page QB2002QB2003QB2004QB2005DCOMCOMObject NameStatus • • • QBXMLRPEQODBCInteractive.exe Success• • • QBXMLRP.dll Success• • • QBXMLRP2EQODBCInteractive.exe Success• • • QBXMLRP2.dll Success• • • • • XERCES-COM.dll Success Current Logged User is: xxxxxx Close DCOMCNFG.EXE and RESTART1. Close DCOMCNFG.EXE 2. Restart the Server or at least stop and restart IIS
Manual DCOM Setup Instructions for Windows 2000 and Windows NT UsersGive the Internet Guest Account (IUSR_<machine_name>), Launch IIS Process Account (IWAM_<machine_name>, ASP.NET Machine Account (ASPNET), SYSTEM and INTERACTIVE accounts permissions to launch and access the qbXMLRPeQODBCInteractive.exe (only for 2003 or older QuickBooks) and qbXMLRP2eQODBCInteractive.exe DCOM objects using dcomcnfg by doing the following: Verification BeforeRun the Windows Task Manager and verify that qbXMLRPeInteractive.exe (only for 2003 or older QuickBooks) and qbXMLRP2eQODBCInteractive.exe are NOT running. End Process if they are. Launch DCOMCNFG.EXELaunch DCOMCNFG.EXE by clicking the Start button, selecting Run, and typing "Dcomcnfg" in the Run dialog box. Edit Permissions of qbXMLRP2eQODBCInteractive1. Select qbXMLRP2eQODBCInteractive and click the Properties... button. 2. In the Security tab, select use Custom access permissions and click Edit, then add Internet Guest Account (<IUSR_<machine_name>), Launch IIS Process Account (IWAM_<machine_name>, ASP.NET Machine Account (ASPNET), SYSTEM and INTERACTIVE to the Registry Value Permissions dialog box. 3. Press OK to save. Edit Permissions of qbXMLRPeQODBCInteractiveNote: qbXMLRPeQODBCInteractive.exe is only needed for 2003 and older QuickBooks. So if you use the latest QB after 2003, you could ignore the below about qbXMLRPeQODBCInteractive.exe. 1. Select qbXMLRPeQODBCInteractive and click the Properties... button. 2. In the Security tab, select use Custom access permissions and click Edit, then add Internet Guest Account (<IUSR_<machine_name>), Launch IIS Process Account (IWAM_<machine_name>, ASP.NET Machine Account (ASPNET), SYSTEM and INTERACTIVE to the Registry Value Permissions dialog box. 3. Press OK to save. Close DCOMCNFG.EXE and RESTART1. Close DCOMCNFG.EXE 2. Restart the Server or at least stop and restart IIS
Sample files
IIS users downloadTestDCOM.ASP PHP users download: TestDCOM.PHP Cold Fusion download: TestDCOM.CFM
IIS users downloadDisplaySQL.ASP PHP users download: DisplaySQL.PHP Cold Fusion download: DisplaySQL.CFM
| |
|
|


