|
[QODBC-POS] How to Install QODBC POS and Connect to QuickBooks POS on Windows Vista / Windows 7 Operating System
Posted by Rajendra Dewani (QODBC Support) on 25 September 2012 09:54 AM
|
|
How to Install QODBC POS and Connect to QuickBooks POS on Windows Vista/ Windows 7 Operating SystemInstall QODBC POSPlease download QODBC Installer from this site: http://www.qodbc.com/posDownload.htm Then run it as administrator: (Right-click on the Installer and select "Run As Administrator")
CDKEY:
If you have purchased a license key, you can directly input your key to get QODBC POS full functional, but if this is the first time you install QODBC POS, you can leave this option blank to get a 30 days evaluation. You can set up QODBC POS default DSN via Windows Start->All Programs->QODBC Driver for use with QuickBooks POS->QODBC POS Setup Screen. And if you found
And if you see the "Evaluation Expired," "Unable to open license," or "Open license failed" description in the About Window of the QODBC POS Setup Screen:
Please run QODBC POS Setup Screen as administrator: ( Required Only Once )
If this is the first time you run QODBC POS and you have to skip the CDKEY step in installing, the About Window should be like this:
Connect to QuickBooks POS via QODBC POSFirst, please open QuickBooks POS:
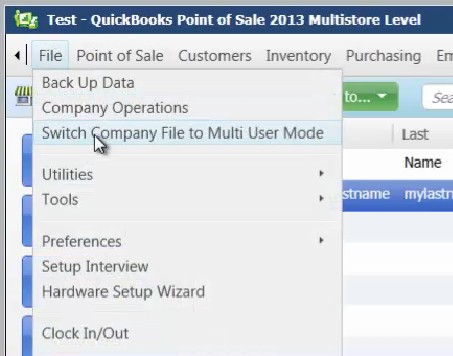
Please make sure you are in a single-user mode. In the File menu, there is an option "Switch Company File to Multi-User Mode," which shows that you are in a single way:
And then, open QODBC POS Setup Screen. Please leave the "Current Company Setting" option blank so that QODBC POS can directly access the company file running in QuickBooks POS. And then click the "Test Connection" button:
Then QuickBooks POS will ask you to grant permissions for QODBC POS:
Click "Yes Always" to continue, and QODBC POS will report the connection successful if everything is ok:
And you can also use QODBC POS Test Tool to test the connection. You can find our test tools QODBC POS Test Tool via Windows Start->All Programs->QODBC Driver for use with QuickBooks POS->QODBC POS Test Tool:
To establish a connection in the QODBC POS Test Tool window, select the "QuickBooks POS Data" DSN from the dropdown list and click "Connect."
Now you can access the QuickBooks POS company file via QODBC POS Test Tool:
Note: QODBC Support Wizard is used only to test QODBC SQL queries and is not a development tool.
Run QODBC POS with QuickBooks POS under Multi-User ModeRun QODBC POS with QuickBooks POS under multi-user mode allows you to access and modify QuickBooks company file when other users logs in. And you can also build a connection string to assign a company file to the DSN so that you don't need to open QuickBooks POS when you use the DSN. First, please switch QuickBooks POS to multi-user mode. Click the "Switch Company File to Multi-User Mode" option to turn QuickBooks POS to multi-user mode:
Then open QODBC POS Setup Screen. Click the "..." button at QODBC POS Setup Screen->General Window to enter the company file selection window:
In the company file selection window, QODBC POS will give you a list of all available company files (may take a few seconds) :
Select the company file you want to access, and then click ok. Then you will see the connection string has been built in the "Current Company Setting" option. And then please click the "Test Connection" Button:
QuickBooks POS will ask you to grant permission to QODBC POS again. Click the "Yes Always" button. If QODBC POS tells you the connection is successful, you can use our QODBC POS Test Tool to view QuickBooks POS records just as you did in single-user mode. | |
|
|


