|
[QODBC-Desktop] How to create or configure a QRemote DSN
Posted by Jack - QODBC Support on 23 January 2018 09:08 AM
|
|
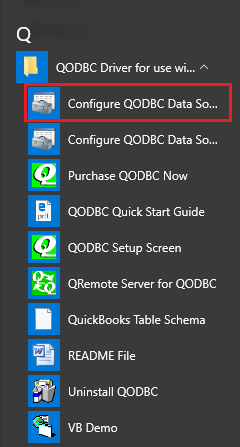
How to create or configure a QRemote DSNLaunch QODBC Data Source ConfigurationLocate the QODBC Driver for the QuickBooks program group from Startup Program: Start >> All Programs >> QODBC Driver for use with QuickBooks >> Configure QODBC Data Source.
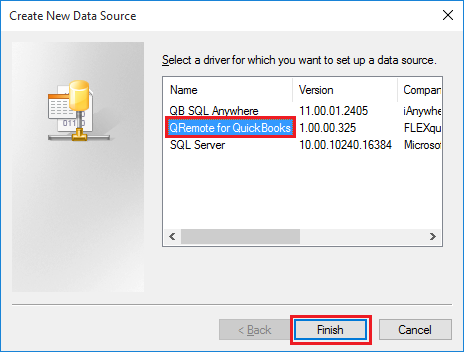
Create a New 32-bit DSNClick on the System DSN tab to create a DSN that both Windows applications and services can call. Click on the Add button to create a new DSN.
Select the QRemote for QuickBooks option and click on the Finish button.
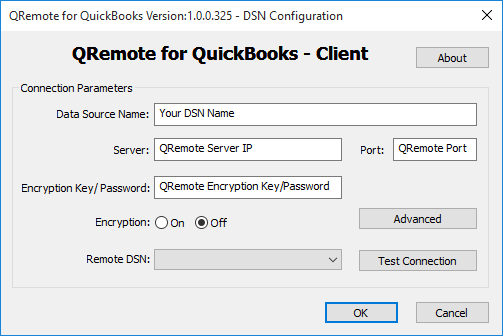
Configure the Created 32-bit DSNUnder the QRemote for QuickBooks Client DSN configuration screen, Please fill in the following information · Server: IP Address displayed on QRemote Server · Port: Port displayed on QRemote Server · Encryption Key/Password: (By Default, Encryption Key/Password is set to "QODBC#QRemote$1". In case you want to change your Encryption Key/Password, You can configure your encryption key on QRemoteServer and use the same on QRemote Client DSN) · Encryption: (By Default, Encryption is set to Off. In case you want to use encrypted data transfer between QRemote client and QRemoteServer, You can configure encryption on QRemoteServer and use the same on QRemote Client DSN) · Remote DSN: select QuickBooks Data DSN from the list. (Make sure QRemote Server is running)
After filling in all the details, click "Test Connection" to test the QRemote connection.
The test connection is successful.
Click "OK" to save the DSN configuration.
New DSN created. Close the ODBC Manager by clicking "OK."
The new QODBC DSN has now been created. To modify the DSN anytime in the future, use the Configure button. Create a New 64-bit DSNNavigate to Start >> All Programs >> QODBC Driver for use with QuickBooks >> Configure QODBC Data Source 64-bit Click on the System DSN tab to create a DSN that both Windows applications and services can call. Click on the Add button to create a new DSN.
Select the QRemote for QuickBooks option and click on the Finish button.
Configure the Created 64-bit DSNUnder the QRemote for QuickBooks Client DSN configuration screen, Please fill in the following information · Server: IP Address displayed on QRemote Server · Port: Port displayed on QRemote Server · Encryption Key/Password: (By Default, Encryption Key/Password is set to "QODBC#QRemote$1". In case you want to change your Encryption Key/Password, You can configure your encryption key on QRemoteServer and use the same on QRemote Client DSN) · Encryption: (By Default, Encryption is set to Off. In case you want to use encrypted data transfer between QRemote client and QRemoteServer, You can configure encryption on QRemoteServer and use the same on QRemote Client DSN) · Remote DSN: select QuickBooks Data DSN from the list. (Make sure QRemote Server is running)
After filling in all the details, click "Test Connection" to test the QRemote connection.
The test connection is successful.
Click "OK" to save the DSN configuration.
New DSN created. Close the ODBC Manager by clicking "OK."
The new QODBC DSN has now been created. To modify the DSN anytime in the future, use the Configure button. Also, refer to the following: How to use QRemoteServer with multiple Windows users - Use a different port for each user. How to create or configure a QRemote DSN Troubleshooting - QRemote Error "Could not connect to server/QRemoteServer" | |
|
|