|
[QODBC-POS] QODBC POS Quick Start Guide
Posted by Jack - QODBC Support on 09 September 2016 12:03 PM
|
|||
QODBC POS Quick Start Guide
QODBC POS Driver License Agreement IntroductionWhat is ODBC?
ODBC (Open Database Connectivity) is a specification designed by Microsoft to: 1. Allow Windows applications to access multiple data sources through a single method with no regard for various file formats; 2. Overcome the problem of different databases having different means of providing access to the information contained within them and; 3. Simplify access requirements so that the user no longer requires a high skill level to access databases.
ODBC also provides the following benefits: 1. SQL (Structured Query Language) is promoted as the method for accessing data through ODBC; 2. It simplifies application development, making access to multiple databases easier; 3. It insulates applications from changes to the underlying network and database versions. Modifications to networking services, servers, and databases will not impact current ODBC applications; 4. The Corporation's investment in the existing database is protected; 5. The developer's acquired database programming skills are protected; 6. Making this easily accessed data available to some users can increase productivity and is a basis for more informed decisions. Microsoft, along with a few other database manufacturers, designed the ODBC driver to provide a standard, consistent and straightforward process of connecting a wide range of databases. Vendors of ODBC drivers (like this one) follow the specifications for ODBC so that any ODBC-compliant application can access the data available through the driver. ODBC-compliant applications include Microsoft SQL Server, Microsoft Access, Word, Excel, PowerBuilder, Borland Delphi, Crystal Pro Report Writer, Visual Basic, and hundreds of others. The placement of this driver can be seen in the illustration below.
What is QODBC for POS? QODBC for POS is an ODBC driver (DLL) for QuickBooks POS format files. This driver allows users of any ODBC compliant front-end application to read and write data contained in QuickBooks POS format files similarly to any other ODBC-enabled database. QuickBooks POS, by default, stores its data in its proprietary DBMS file format. QODBC for POS works by accepting SQL commands through the ODBC interface, converting those calls to navigational controls to the QuickBooks POS DBMS, and returning record sets that qualify for the query results.
What can I do with QODBC for POS? QODBC for POS opens up the QuickBooks POS files to a new world of database connectivity. In the same way, Windows has created an environment where all applications have a similar look and feel; ODBC drivers make all database formats look the same. · A user of Microsoft Office can use Excel to pull company accounting or invoice information into a spreadsheet and create a chart. · Microsoft Word can merge a customer mail directly from QuickBooks POS files. · Crystal Pro Report writer can create multi-file reports from QuickBooks POS data. · Microsoft Access or Alpha 5 can merge QuickBooks POS data with other data sources to produce complex reports or run mass file updates based on multiple criteria. QuickBooks POS application developers can now offer this driver to their customers, allowing them direct access to data vital to them through custom third-party applications. Business personnel who require up-to-the-minute data to make on-the-fly business decisions will have that real-time data instantly available to virtually hundreds of desktop applications. Best of all, this driver is transparent and works precisely like ODBC drivers from other vendors.
InstallationInitial Setup If you have downloaded this program, run the self-extracting executable in a temporary directory to extract the installation files. Don't forget to read the "Readme" file during installation for the latest information on QODBC for POS setup and other information. Unload the Microsoft Office toolbar from memory and any other Windows applications that can impair installation. Click on the Install program from within Windows to install the driver. Select the destination directory to install the QODBC for POS support files. Click "OK" to continue.
The FLEXquarters QODBC Driver for QuickBooks POS has been installed on your computer. You can begin to use it immediately because it will directly run as a 30-day evaluation edition, with read/write access to the QuickBooks POS tables. Note: Inserts are limited to 20 per session
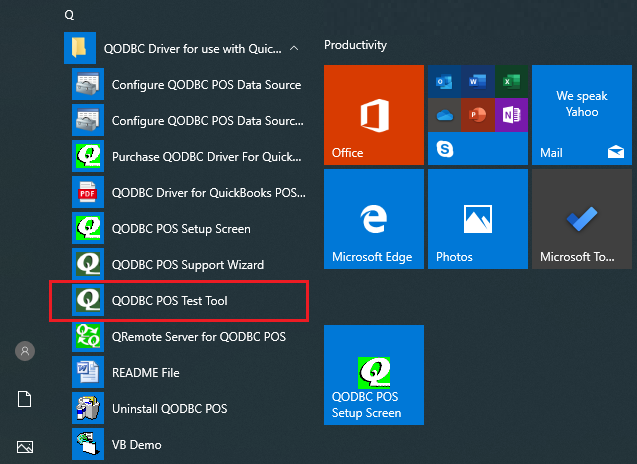
To install a complete purchase or evaluation QODBC for the POS registration code, see the Icons that have been added to your Start Menu under QODBC Driver for QuickBooks POS. The first step in configuring the driver is to click on the ODBC for POS Setup Screen icon, and the following screen will become available. QODBC for POS Setup Screen
Use Practice Mode when checked will use a POS sample data file which can be selected in the drop-down. Data Source Name is a display name for your QuickBooks POS data (QuickBooks POS Data, QBPRO, My QB Data, etc.) Company File User Name=the name of your computer goes here; Company Data=the name of your data file goes here; Messages Menu
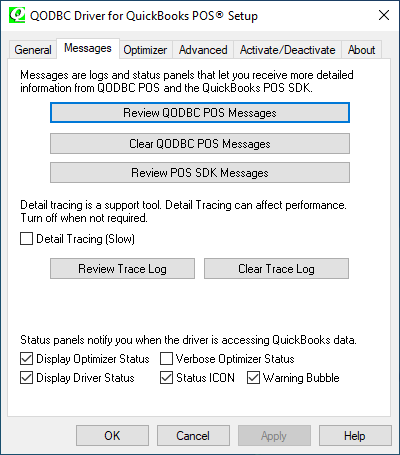
Message Center allows you to review messages from QODBC for POS regarding errors and issues communicating with QuickBooks POS. Clear these messages, and review messages produced by the QuickBooks POS SDK interface. Detail Tracing (Slow) creates a trace log of what QODBC for POS is doing in the background, with the application using it for debugging purposes. Ensure the record is turned off when not needed, as these logs can use up large amounts of disk space. Display Optimizer Status Panel will display the progress of optimization on the data; this is especially helpful on large data files being reloaded in their entirety. Verbose Optimizer Status causes the Optimizer panel to come up whenever any optimizer happens. The standard checkbox only pops up the Optimizer when doing the full update or reload. Display Driver Status Panel, when selected, shows precisely what QODBC for POS is doing when accessing the QuickBooks POS data and provides a good assessment of speed using optimized and non-optimized data. Status Icon displays a green "Q" in your system tray when QODBC for POS is used. It allows you to interact with QODBC for POS while connected to QuickBooks POS. Warning Bubble When this is checked, the QODBC icon will display a warning message reminding you that QODBC for POS is still working if QuickBooks POS takes longer than 30 seconds to return information.
Optimizer Tab
The optimizer brings some data to a local cache to increase query retrieval performance. Here you can adjust where optimizations are stored and when they are updated. Check to activate the Optimizer. Optimizer Database Folder specifies where the local data store will be saved on disk. The default location is under the folder where you specified QODBC for installing POS. The data will be stored in this folder with a name similar to the company file. If you can keep that data somewhere other than the default, click the browse button and select the destination folder. With huge company files, we suggest running synchronization after hours. Keep my optimized data up to date as of when you choose the Optimizer to synchronize itself with your Company data. Depending on how static your data need is and the file size, you can opt for various time frames of synchronization. The farther down the list you go, the less synchronization will occur, and your queries will run much faster but will be using less current data than the company files themselves. · Every query starts with the default setting using the most current data. Use this default setting if your reporting needs require the latest up-to-the-minute data and speed is not the primary focus. · The end of yesterday is used for a better balance between speed and data updating and would be the best option for most users. It only has to synchronize each table once daily, and the data will be current at the end of the previous day. · The end-of-last-month option is a significant speed boost for running last month's or last year's reports. It does not need to synchronize again to get the data. · The last time I pressed one of the load data buttons options allowed you to control the synchronized timing. Synchronizing only occurs when you manually run it by pressing the Load Update Data. · For balances and stock quantities: the option "Nulls" - will return NULLs for all fields that cannot be kept in sync, "Dirty Reads" - means return the most current value that was loaded into the optimizer cache, and "Real-Time" uses the slower method to get the data directly out of QuickBooks making sure you get the most current value for the requested fields. (Real-Time is the previous method used). · Optimize data after an Insert or Update: causes QODBC for POS to do "Load Updated Data" after an insert or update is executed on a table. Useful for programmers who want to test that their data has successfully been written to QuickBooks POS. · Multi-Table Sync: This option is unchecked by default for all non-USA enterprise users. If checked, the QODBC for the POS optimizer will use other tables to re-sync tables; however, this will slow down performance when all Multi-Table Sync fields become Real-Time fields. (Similar to version 7.0.x) Note: This feature is ignored and set to unchecked if the version is QBOE or SDK is less than v3 (used by QuickBooks 2004 USA and all QuickBooks versions outside the USA). Before SDK v3, the other multi-sync tables did not exist, so using accurate data for those fields is safer. · Load Updated Data This button is used to synchronize your optimized data with your company file. This will only load the data that has changed since the last automatic or manual synchronization. · Reload All Data This button is used to completely rebuild the optimized data from scratch. It is useful when you start a new company if you do not want to synchronize the tables you first encounter and ensure your data is 100% current.
Advanced Menu
The selected defaults in the Advanced settings should apply to most users and need not be changed. Reconnect Delay Is the time to wait after a disconnect when using the remote connector. This allows QuickBooks POS to fully unload it if it is being loaded into the background on the Host Remote Connector before you connect again. Maximum Field Name Length is set to the QuickBooks POS limitation, but certaspecificications like Delphi cannot handle this limit and must be set accordingly. Use Case Sensitive RefNumber Searches, when checked, means a RefNumber of 'ABC' and 'Abc' ABC be different but means QuickBooks POS can use an index internally for a search instead of a complete table scan. Include Raw Files if c, checked will display both filtered and raw data formats. QODBC formats data into SQL field types more easily used in programming languages for math and comparison operations. The Raw tables return the data as it is returned to QODBC for POS without modification. ODBC Compatibility "Default" is 2.1. ODBC compatibility is for certaspecificications that require ODBC 2.1 Compatibility to use QODBC. Anything that uses the Java ODBC library, like ColdFusion, requires this option turned on, or recordsets will be returned with no row sets or only a 1-row set.
If you are uuseosoft Excel Power Query or Microsoft Power BI, change the ODBC Compatibility to 3.8. SQL Server Support/Simulate Transaction Support for SQL Server will turn transaction support on so that SQL Server will allow updates when using QODBC as a linked server. QODBC for POS still does not support transactions but simulates the turning on and off of transactions. Use Iterators and Iterator or Chunk Size fields to allow you to turn off iterators. This is needed on systems and Web Servers that use multiple threads. Integrated Application Defaults are the defaults set in the integrated application's dialog within QuickBooks and are available in the US versions of QuickBooks.
Activate/Deactivate Tab
This tab allows you to purchase a CDKey, activate a license with the CDKey, or deactivate a currently active license and move that license to a new machine.
Activate is the online option for entering the CDKey that was issued to you upon purchasing the product to fully activstartC from the evaluation version to either the full Read Only, Read/Write, or Web/Server Edition that has been purchased. Suppose supposed not have internet access to activate the product you. In that case, you can use the phone option to supply your reseller or distributor with the information to activate the product.
Deactivate is the online method of deactivating a currently registered version of QODBC to transfer the product to another machine. This internet access is not available from the registered device. You can use the phone option to supply your reseller or distributor with the information to deactivate the product CDKey for you.
Ab This process will take 24 to 48 hours before your CDKey account is credited with the deactivated license, and you can reactivate the license on a different machine.out Tab
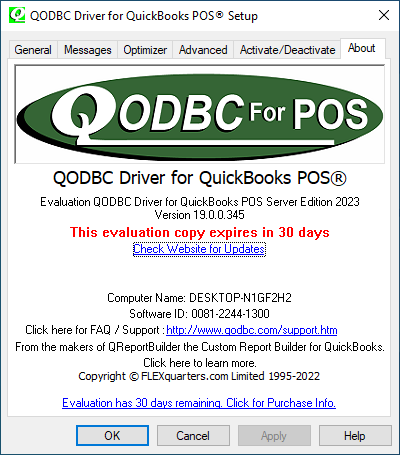
About screen shows the QODBC version currently installed, whether it is an evaluation copy or fully registered. The first letter in the serial number denotes what license type is installed (R for Read-Only, M for Read Write), the 2nd & 3rd digit the QODBC for POS version, and the fourth denotes what version of QuickBooks POS (US), the license is compatible with. (The serial number may be required for upgrades, rebate offers, technical installation support, or the Help Desk system.) Check Website for Updates will launch your internet browser to our website and check you have the latest QODBC for POS installed on your machine. You can view the Readme file for the list of all the latest features in the current version of QODBC for POS and download the latesnewestter should you use the older version of the driver.
The first use of QODBC for POS after setup is complete Testing Installation The first time you run this driver (for example, you can test it using the QODBC POS Test Tool included), you need my stunning QuickBooks POS Pro on the machine simultaneously logged in as Administrator. This is for security reasons. Click on the QODBC POS Test Tool icon to launch the application.
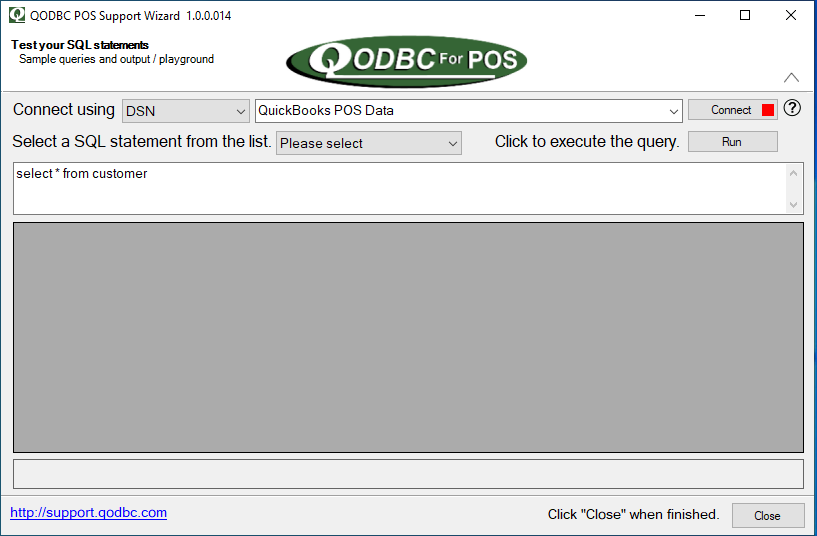
To establish a connection: select the "QuickBooks POS Data" default DSN, and Click "Connect."
." when the driver starts, QuickBooks POS will ask permission for the driver to access your QuickBooks POS data. Answer "Yes, Always" to this, and the QODBC for POS the river is added to the Integrated Application list.
This will allow applications to integrate with QuickBooks POS data when QuickBooks POS is running on the desktop. There may be instances where you want an integrated application designed to share data with QuickBooks POS to access QuickBooks POS files automatically without user intervention. This might permit, for example, a particular application to run during the night when there is no other activity on the company file. Also, QuickBooks POS need not be running for ODBC compliant applications to access the data files while setting in this mode.
Testing Driver CapabilitiesThis driver is not guaranteed to work with all possible front-end ODBC applications, and it would be impossible to test them all. If you find you have problems with this driver that do not occur in other ODBC drivers, contact support at FLEXquarters. We do want to provide maximum compatibility wherever possible. A simple test program called QODBC POS Test Tool has been included in this product to allow basic testing and isolate problems from various environments. QODBC POS Test Tool After accepting the certificate, the QODBC POS Test Tool is successfully connected to the QuickBooks POS company file.
Now you can run the default SQL statement or write your SQL Statement and click on the "Run" button to extract the records.
To disconnect, click the "disconnect" button.
Tutorials and DocumentationQODBC for QuickBooks POS is very similar to our QODBC for QuickBooks editions, except that it is a true ODBC and does not need the QuickBooks POS system to access the data. Much of the documentation we have for QODBC also applies to the QODBC for POS drivedriverscan be found at www.qodbc.com Step by Step Tutorials To follow the tutorials using the QODBC for POS driver, simple QuickBooks POS data DSN when getting external data ODBC sources. Data Schema Using the QODBC POS Test Tool included with QODBC for QuickBooks POS, you can view the schema of the individual tables using the following SQL statement: sp_columns table nameonfiguring QRemote POS after QODBC is set up. QuickBooks POS and QODBC POS are 32-bit applications and work with 32-bit Applications. If you have 64-bit applications, they cannot communicate with 32-bit drivers like QODBC. To overcome this limitation, QRemote works as a bridge between 64-bit Applications and the 32-bit QODBC Driver. QRemote allows Web Servers and 64-bit applications to talk to QuickBooks via the QODBC POS Driver. QRemote has two components "QRemote POS Client Driver for QODBC" and the "QRemote Server for QODBC POS." QRemote POS Client Driver: Allows 64-bit application (s) to connect to the QRemote server and sends the Request to QRemote Server for processing. QRemote POS Server: Processes a requested instruction from the QRemote Client to QuickBooks using the QODBC DSN Driver. Setting Up A New QRemote Connection.
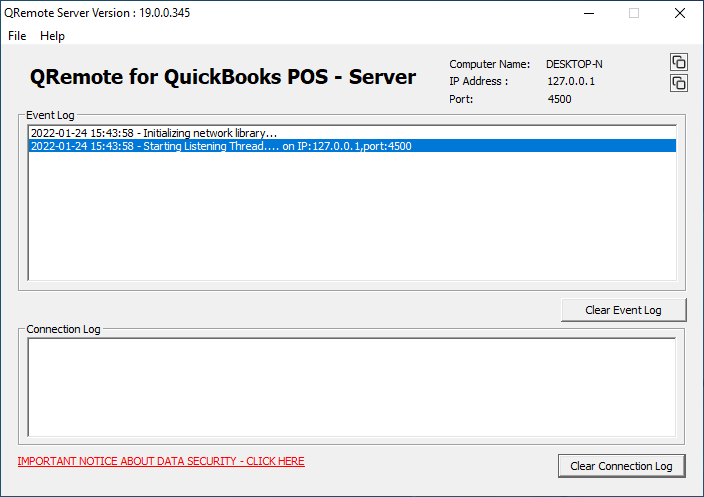
Start "QRemote Server for QODBC POS" from the start menu.
Double-click the QRemote Server icon from the system tray.
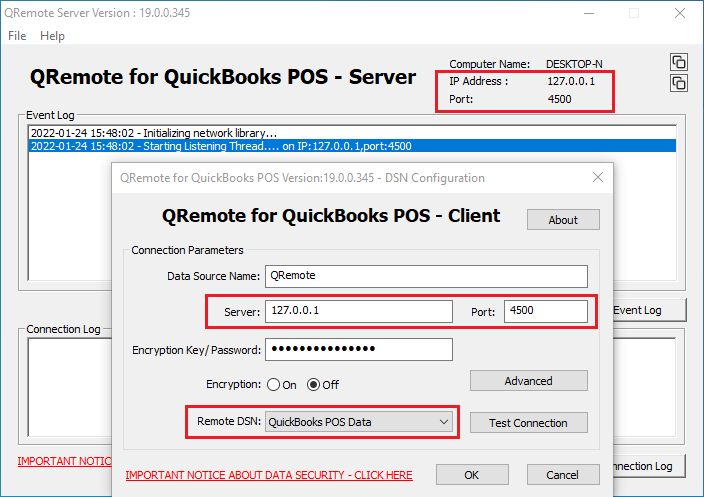
QRemote Server Main screen shows the IP address, and the Port allows the QRemote client to connect. Note the IP address and Port number listed on the QRemote Server "Event Logs window."
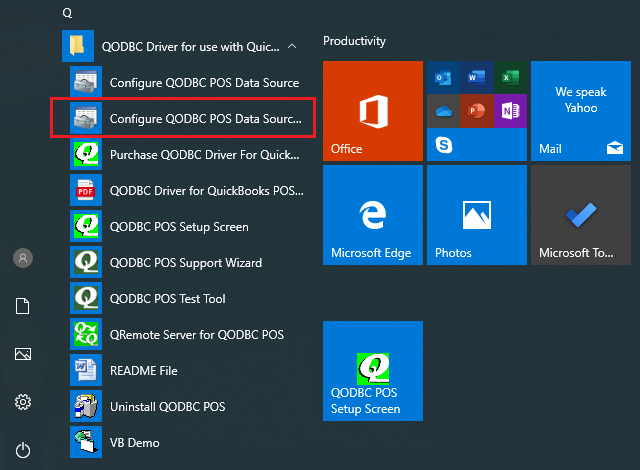
Create a new DSN entry Before creating a DSN entry, verify you have made a DSN entry for QODBC, which can connect to QuickBooks. The ODBC Manager 32-bit can be found under Start Menu à All Programs à QODBC Driver for use with QuickBooks POS à Configure QODBC POS Data Source.
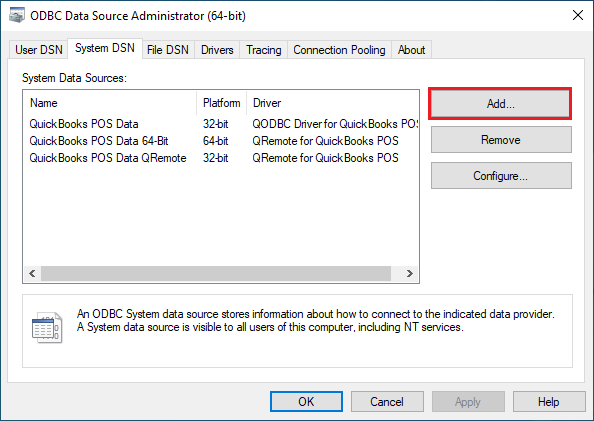
To create a new QRemote DSN entry, navigate to ODBC Manager 64-bit. Located under Control Panel > Administrative Tools > Data Sources (ODBC).
Or
Start Menu >> All Programs >> QODBC Driver for use with QuickBooks POS à Configure QODBC POS Data Source 64-bit.
Navigate to System DSN. Click on the "Add" button.
Select "QRemote for QuickBooks POS" from the driver list and click "Finish."
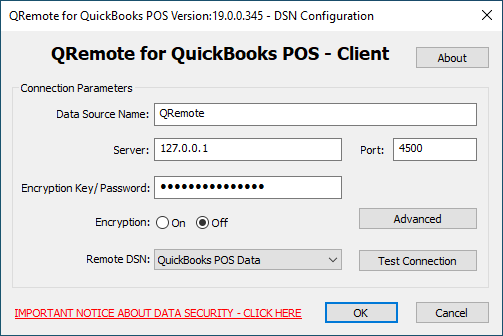
Under the QRemote for QuickBooks POS – Client DSN configuration screen, Please fill in the following information: § Data Source Name: Name of your DSN entry § Server: IP address displayed on QRemote Server § Port: Port displayed on QRemote Server § Encryption Key: QRemoteServer has an Encryption feature that will send/receive data between the client & server in an encrypted format. So you can use this feature. (By Default Encryption Key/Password is set to "QODBC#QRemote$1") § Remote DSN: select the QODBC DSN from the list. ( Make sure QRemote Server is running)
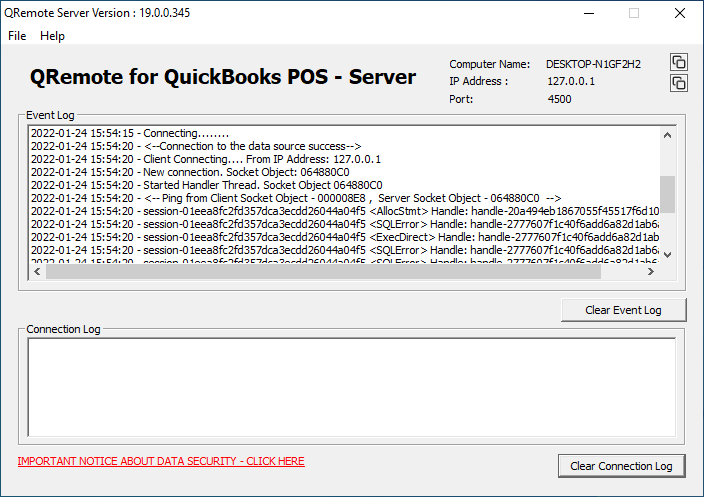
Verify the QRemote client connects to the server and that the below-listed logs are logged in the event window.
Connecting with 64-bit ApplicationsTo allow 64-bit application (s) to talk to QuickBooks via QODBC, Start the QRemote server and configure the QRemote Client DSN entry.
How to connect with 64-bit MS Access. -Create or Open MS Access Database -Navigate to the "External Data" tab and select "ODBC Database."
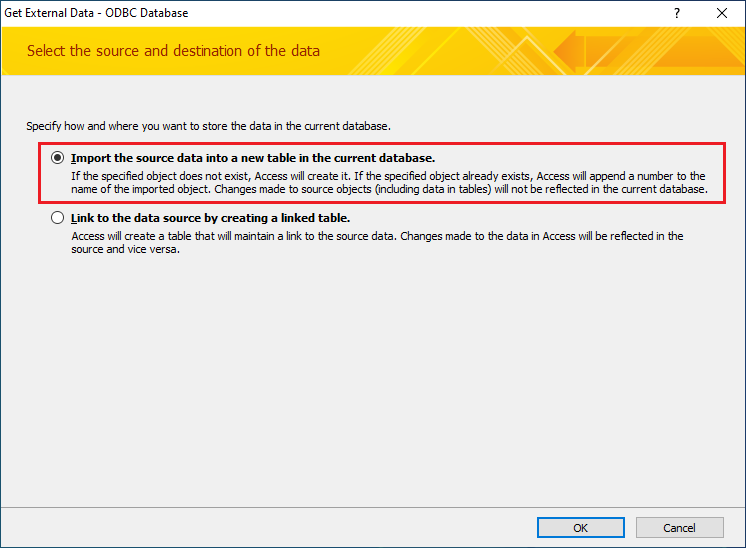
Select the method to import the data
Select the "QuickBooks POS Data QRemote" DSN from the list under "Machine Data Source."
(May List Either "QRemote POS Data 64-bit" or "QRemote POS Data 32-bit")
You will notice the connection information getting logged under QRemoteServer.
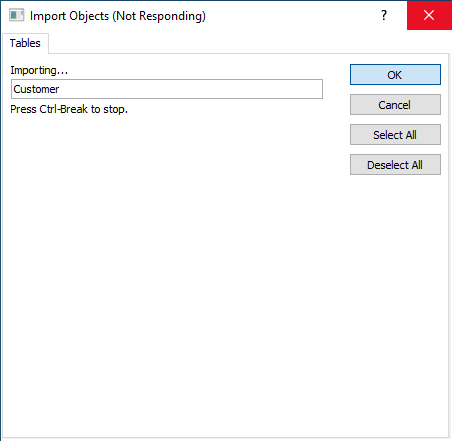
Select the table(s) you want to import to MS Access and click "OK." MS Access imports the table(s) information via QRemote.
After the import process is completed, a notification window appears in MS Access.
A list of an imported table(s) will be shown under "All Access Objects."
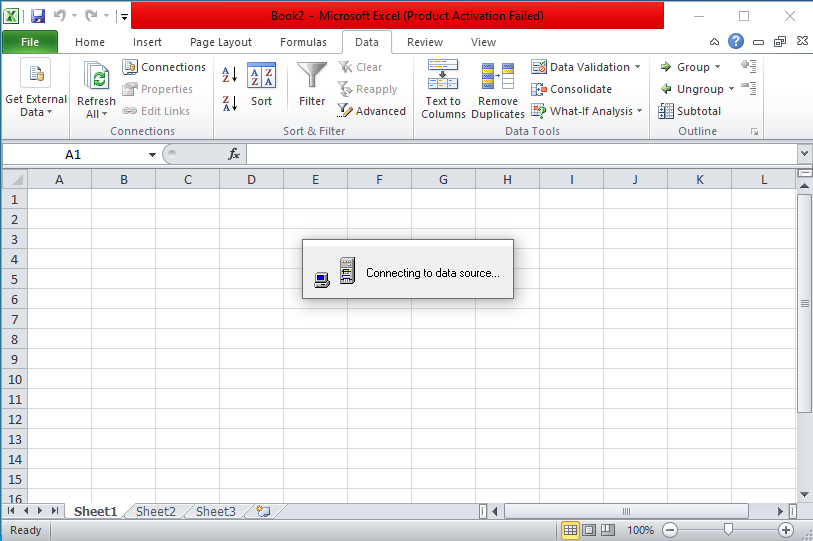
How to connect with 64-bit MS Excel. Create or open an MS Excel 2010 Spreadsheet and navigate to "Data">>"Get External Data">> "From Other Sources">> Select the source as "From Microsoft Query."
Select QRemote Client DSN entry from the list.
(May List Either "QRemote POS Data 64-bit" or "QRemote POS Data 32-bit")
You will notice the connection information getting logged under QRemote Server.
Select the table(s) you would like to import.
Select the columns you want from the list -
If you want to filter the data, you can opt for data filtering based on the criteria you specify.
Select "Return Data to Microsoft Excel" and click "Finish."
Choose the Output Location
MS Excel may take a few moments to populate data into the worksheet.
QODBC for POS Frequently Asked QuestionsThe Frequently asked questions about this product are constantly changing, so we have a web page set up with these questions. It can be found at: http://www.qodbc.com/support.htm
QODBC for POS SupportThis driver has the following ODBC support and limitations: · Only ODBC, Core Level SQL, is supported. · Only ODBC Level 2 API calls are supported. · ODBC Version 3.0 compliant. · Column and table names are not case-sensitive. String data comparisons are case-sensitive. · Character values supplied for parameterized queries (SELECT * FROM EMP WHERE NAME = ?) are limited to 255 characters. · Transactions are not supported. · Qualifiers and owners are not allowed in databases, tables, etc. · Table creation and deletion are not supported currently. Windows Support This product supports Microsoft Windows 95, Windows 98, Windows NT, Windows ME, Windows 2000, Windows XP, Vista, and Windows 7. Product Support We offer a free, fully-functional trial copy of QODBC for POS limited to selected elements in the QuickBooks POS system. An FAQ section and a Help Desk support system are available for registered users and those evaluating QODBC for POS. Those purchasing the product will receive Free installation support for 30 days from the date of purchase. Program anomalies will be addressed at no charge, and updates will be posted on our website. Other issues may be subject to a fee. The following methods can obtain support: Mail: FLEXquarters.com LLC 2620 S Maryland Pkwy Ste 14 # 557 Las Vegas, NV 89109-1692
Forum Online Support: http://www.qodbc.com/QODBCAutoFAQ.htm E-mail: mailto:info@qodbc.com Newsgroups http://groups.yahoo.com/group/qodbc The most effective of these methods is the Forum support system via our website since you can attach an ODBC or SDK trace log to the message, and we can connect an updated product to you if we have a patch. Before contacting us, run an ODBC trace log of the operations you are having problems with and get the application vendor to see if they are driver-related problems. If they are, send us the file and a description of the problem.
Product Updates Since the product is distributed in Demo form, the latest updated versions will always be available online at our web page: http://www.qodbc.com/posDownload.htm.
QODBC for POS Credits
QODBC for POS version 18 For Microsoft Windows 95, Windows 98, Windows ME, Windows NT, Windows 2000, Windows XP, Vista, Windows 7, Windows 8, and Windows 10. © Copyright 1995-2017, FLEXquarters.com LLC, All Rights Reserved Worldwide Portions of this product © Copyright Intuit Incorporated QODBC is a trademark of FLEXquarters.com LLC QuickBooks Point of Sale is a registered trademark of Intuit Incorporated Windows and Vista are registered trademarks of Microsoft Corporation All other trademarks are copyrights of their respective holders Version 1.0 First released July 2005 Version 9.0 First released June 2010 Version 10.0 First released May 2011 Version 13.0 First released September 2012 Version 15.0 First released June 2015 Version 18.0 was First released in October 2017
The program was published and supported by: FLEXquarters.com Limited 41-43 Carnarvon Road Suite 809 Tsim Sha Tsui Kowloon Hong Kong USA Mailing Address: 2620 S Maryland Pkwy Ste 14 # 557 Las Vegas, NV 89109-1692 WWW: http://www.qodbc.com E-mail: info@qodbc.com
USA Sales Office: FLEXquarters USA Sales P.O. Box 0036 Union Lake, MI 48387-0036 E-mail: mark@qodbc.com Voice: 248-620-2400 Licensing Support 248-620-2406 (Registered user activation/deactivation issues only)
Brad Waddell, Matthew Froncek, and Rajendra Dewani developed the program. Documentation produced by Mark Kuznar, Brad Waddell, and Rajendra Dewani.
Tags: configurations, permissions, user rights
| |||
|
|
|||


 (On 32-bit Operating System)


