


|
[QODBC-Desktop] QODBC Setup Options - QODBC For QuickBooks Enterprise Users
Posted by Rajendra Dewani (QODBC Support) on 28 January 2015 08:54 AM
|
|
|
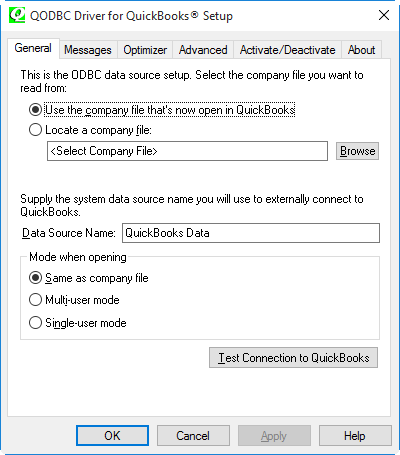
Connecting QODBC Driver to QuickBooks for the First Time (Video) You can also see: How to set up QODBC for Auto-login into QuickBooks / How to set up QODBC Driver to auto-connect to QuickBooks. (Video) for more details. See also: How to use QODBC Support Wizard for testing. See also: VB Demo is missing QODBC Setup OptionsQODBC General SetupThe first step in configuring the driver is to click on the QODBC Setup Screen, and the following general setup screen will become available.
Using the company file that's now open in QuickBooks allows QODBC to use the company file that you have available and will enable you to switch between files withoucreatingte separate DSNs for each company file. Locate a company file: this is where your QuickBooks data file resides. For example: “C:\Documents and Settings\All Users\Documents\Intuit\QuickBooks\Sample Company Files\QuickBooks Enterprise Solutions 9.0\ProMyapp.qbw”. The Browse button will let you choose your QuickBooks company file from its folder. To use the QODBC auto-login unattended mode, specify the full path of the QuickBooks company file you wish to connect to. Data Source Name: This is a display name for your QuickBooks data (QuickBooks Data, QBPRO, My QB Data, etc.) Mode, when opening, includes multiple ways of opening a QuickBooks file, and this setting allows you to determine how QODBC should open each company file. Same as the company file. If you select "Follow Company File," we will use whatever mode is currently set in the company file. Multi-user mode Selecting "Multiuser Mode" will set the file to Multi-user status, where multiple users can update the file simultaneously. Single-user mode If you require exclusive write access to the file (for record deletes), select "Single User Mode." Test Connection to QuickBooks will determine if you have a proper installation and settings with QuickBooks and a company file open. QODBC Messages SetupMessages allow you to review message logs from QODBC regarding errors and issues communicating with QuickBooks, clear these messages, and review messages produced by the QuickBooks qbXML SDK interface.
Detail Tracing (Slow) creates a trace log of what QODBC is doing in the background with the application and is used for debugging purposes. Ensure the record is turned off when not needed, as these logs can use up large amounts of disk space. Display Optimizer Status Panel will display the progress of optimization of the data; this is especially helpful on large data files being reloaded in their entirety. When selected, Display Driver Status Panel shows precisely what QODBC is doing when accessing the QuickBooks data and provides a good assessment of speed using optimized and non-optimized data. Verbose Optimizer Status Panel causes the Optimizer panel to come up whenever any optimizer happens. The standard checkbox only pops up the optimizer when doing the full update or reloading.
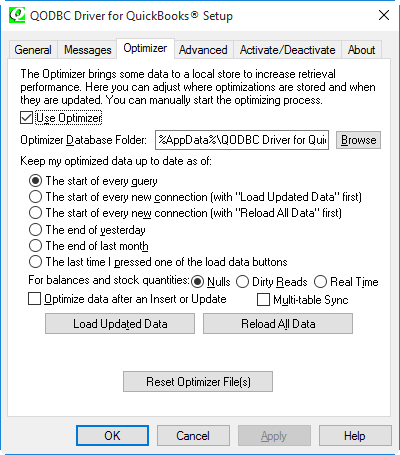
QODBC Optimizer SetupRecommended settings for using QODBC are shown here. Read below for a summary explanation of all the options available to you. You can see: How to set up QODBC Optimizer and where are the Optimizer options for more details about QODBC Optimizer.
The optimizer brings some data to a local cache to increase query retrieval performance. Check to activate the Optimizer. Optimizer Database Folder: specifies where the local data store will be saved on disk. The default location %UserProfile%\QODBC Driver for QuickBooks\Optimizer is under your Windows login account name under your Documents and Settings folder. The data will be stored in a file in this folder with a name similar to the company file name with a .opt extension. If you keep that data somewhere other than the default, click the browse button and select the destination folder. With very large company files, we suggest running synchronization after hours. Keep my optimized data up to date as of when you choose the optimizer to synchronize itself with your Company data. Depending on how static your data need is and the size of the file, you can opt for various time frames of synchronization. The farther down the list you go, the less synchronization will occur, and your queries will run much faster but will be using less current data than the company files. The start of every query is the default setting using the most current data. Use this default setting if your question requires the latest up-to-the-minute data and speed is not the primary focus. Please remember that the QODBC Optimizer is local to your computer only, so when other users change things in QuickBooks, how does QODBC know? The optimizer will default update new and revised entries in a table from QuickBooks and then execute the query against the locally optimized table. This is faster than reading everything out of QuickBooks every time, especially the more data you have. The start of every new connection (with "Load Updated Data" first) is used if you don't need to update the optimized data while you are, for example, running queries or importing or exporting data. The optimized information is updated upon a new connection and left updated until the following new link occurs again. The start of every new connection (with "Reload All Data" first) is used if you need to rebuild optimized data from scratch before running important queries (like Sales Commission) or importing or exporting data. The optimized data is rebuilt upon a new connection and left un-updated until the next new connection occurs again. The end of yesterday is used for a better balance between speed and data updating and would be the option that works best for most users. It only has to synchronize each table once daily, and the data will be current at the end of the previous day. The end-of-last-month option is a great speed boost for running last month's or last year's queries. It does not need to synchronize again to get the data. The last time I pressed one of the load data button options allowing you to control the synchronized timing. Synchronizing only occurs when you manually run it by pressing the Load Updated Data in the QODBC setup screen. For balances and stock quantities: the option Nulls - will return NULLs for all fields that cannot be kept in sync, Dirty Reads - means return the most current value that was loaded into the optimizer cache, and Real-Time uses the slower method to get the data directly out of QuickBooks making sure you get the most current value for the requested fields. (Real Time is the previous method used). Optimizing data after an Insert or Update causes QODBC to do Load Updated Data after an insert or update is executed on a table. Useful for programmers who want to test that their data has successfully been written to QuickBooks. The multi-Table Sync option is unchecked by default for all non-USA enterprise users. If checked, the QODBC optimizer will use other tables to re-sync tables. However, this will slow down performance. When off, all Multi-Table Sync fields become Real-Time fields. Note: This feature is basically ignored and set to unchecked if the version is QBOE or SDK is less than v3 (used by QuickBooks 2004 USA and all QuickBooks versions outside the USA). Prior to SDK v3, the other multi-sync tables did not exist, so using real data for those fields is safer. Load Updated Data: This button is used to Synchronize your optimized data with your company file. This will only load the data that has changed since the last automatic or manual synchronization. Reload All Data: This button is used to rebuild the optimized data from scratch completely. It is useful when starting a new company if you do not want to synchronize the tables as you first encounter them and ensure that your data is 100% current. Removing/deleting optimizer file.To delete the optimizer file. Please close/disconnect all the applications connected to QODBC. Start "QODBC Setup Screen" & Switch to the Optimizer tab
Click "Reset Optimizer File(s)"
Click "Yes" to delete all the Optimizer files.
Please note: All the Optimizer files under the Optimizer Database folder will be removed if you wish to delete a single company file's optimizer. The optimizer file can be found at "%appdata%\QODBC Driver for QuickBooks\Optimizer." For Example: C:\Users\Raj\AppData\Roaming\QODBC Driver for QuickBooks\Optimizer
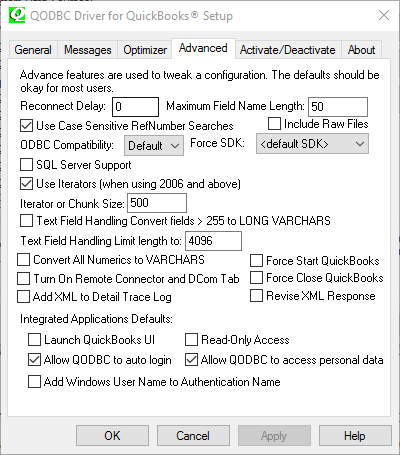
QODBC Advanced SetupThe selected defaults in the Advanced settings should apply to most users and normally don't need to be changed.
Reconnect Delay: This is the time to wait for a disconnect when using the remote connector. This allows QuickBooks to fully unload it if it is being loaded in the background on the Host Remote Connector before you connect again. Maximum Field Name Length: is set to the QuickBooks limitation, but certain applications like Delphi cannot handle this limit and must be set accordingly. Use Case Sensitive RefNumber Searches, when checked, means a RefNumber of 'ABC' and 'ABC' will be different but means QuickBooks can use an index internally for a search instead of a complete table scan. (Note: this feature applies to versions of QuickBooks 2005 and higher) Include Raw Files, if checked, will display both filtered and raw data formats. QODBC formats data into SQL field types more easily used in programming languages for math and comparison operations. The Raw tables return the data as it is returned to QODBC without modification. ODBC Compatibility "Default" is 2.1. ODBC compatibility is for specific applications that require ODBC 2.1 Compatibility to use QODBC. Anything that uses the Java ODBC library, like ColdFusion, requires this option turned on, or recordsets will be returned with no row sets or only 1-row sets.
If you use Microsoft Excel Power Query or Microsoft Power BI, change the ODBC Compatibility to 3.8. SQL Server Support/Simulate Transaction Support for SQL Server will turn transaction support on so that SQL Server will allow updates when using QODBC as a linked server. QODBC still does not support transactions but simulates the turning on and off of transactions. The Advanced tab in QODBC Setup v6 Build 186 later has new defaults for Use Iterators and Iterator or Chunk Size fields. This allows you to turn off iterators. This may be needed on systems like MS-SQL Server and Web Servers that use multiple threads. Using Iterators is faster but is only available to USA QuickBooks 2006 and USA QuickBooks 2007 users. Iterator or Chunk Size determines the size of the row sets that are retrieved from QuickBooks. Set this value high if you are exporting records from QuickBooks. The maximum Iterator or Chunk size that can be set is 100000 (more elevated than that, and it resets itself back to the default of 500). Use Iterators and Iterator or Chunk Size fields to allow you to turn off the iterator. This is needed on MS-SQL and Web Servers that use multiple threads. Integrated Application Defaults authorization popup settings. These settings are only available to USA QuickBooks 2005 and above users. Otherwise, they are grayed out as follows:
Text Field Handling has been added to QODBC v7.00.00.204 and later. Convert Fields > 255 to LONG VARCHAR and Limit length to 4096 characters (default): These fields help some development environments get data from extended areas that would not be able to otherwise. Connection string options include ConvertToLongVARCHAR=Yes|No, and MaxLONGVARCHAR=4096.
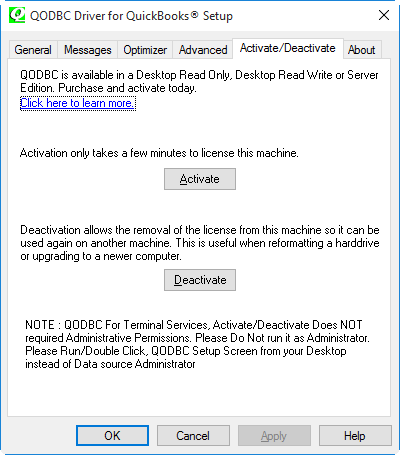
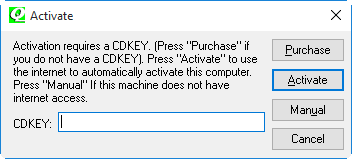
This tab allows you to purchase a CDKey, activate a license with the CDKey, or deactivate a currently active license and move that license to a new machine.
Activate is the online option for entering the CDKey that was issued to you upon purchasing the product to fully start QODBC from the evaluation version to either the full Read Only, Read/Write, or Web Edition that has been purchased. Suppose you do not have internet access to activate the product. In that case, you can use the phone option to supply your reseller or distributor with the information to activate the product.
| |
|
|


Though the kit is purported to be a free add-on for QB Enterprise, thee QODBC setup seems to require a license key to activate.
How do we obtain a key (or otherwise activate) QODBC for QB Enterprise?
I would like to share that when QODBC is installed on a new machine it starts with 30-day evaluation (All features are active). But QODBC evaluation version will turn to Read Only edition for QuickBooks enterprise edition – automatically after 30 days (If QuickBooks Enterprise Edition v10 or above is installed).
So there is no CD KEY require for activation of Read Only edition for QuickBooks enterprise edition.
QODBC Read-only edition for QuickBooks Enterprise does not include QRemote License. So after 30 days, you may not be able to use QRemote. So if you are using QRemote, then I would suggest you purchase a latest QODBC license to see if it can solve the issue. You can get in touch with our sales team for licensing query:
http://qodbc.com/contact.htm
"The following feature couldn't be installed:
.NET framework3.5.."
How we can fix this problem.
Thanks
Please enable & start Microsoft Windows Update & try to install QODBC it will ask for installing .Net Framework, please install .Net Framework and test again.
If you are still the facing issue, Please raise a support ticket to the QODBC Technical Support department from below mentioned link & provide requested information:
http://support.flexquarters.com/esupport/index.php?/Tickets/Submit
We may need the following information, Please attach below listed files when replying to the ticket.
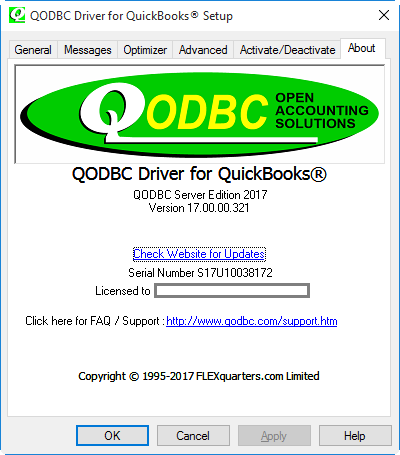
1) Screenshot of QODBC Setup Screen -- > About
2) Screenshot of the issue you’re facing.
Share Entire Log Files as an attachment in text format from
3) QODBC Setup Screen -- > Messages -- > Review QODBC Messages
4) QODBC Setup Screen -- > Messages -- > Review SDK Messages
Refer: How to take screenshot: www.qodbc.com/links/screenshot.htm