|
[QODBC-Desktop] How to get QuickBooks data displayed in an Internet Explorer Browser
Posted by Juliet (QODBC Support) on 01 April 2010 07:29 AM
|
|
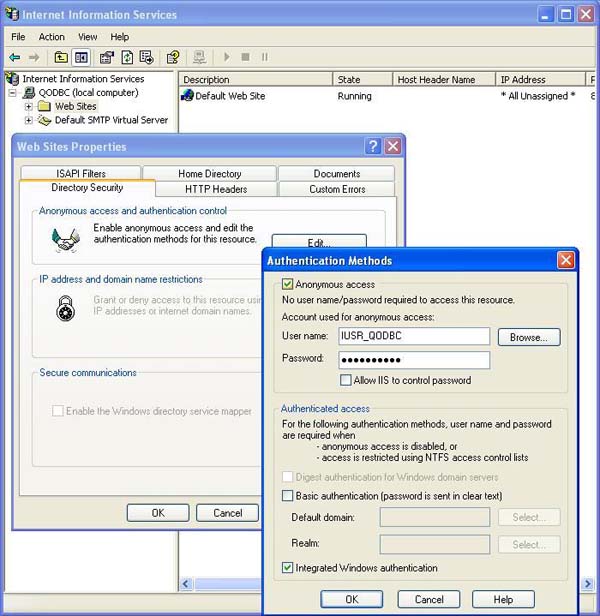
Instruction on Viewing Live QuickBooks Data within your BrowserQODBC can talk to a copy of QuickBooks running anywhere in the world over the internet or your local area network. The feature is built-in and requires no additional charge. Using the feature allows you to set up multiple workstations with QODBC on a network to call a server or another workstation (or over the internet) running one copy of QuickBooks. Run your application using QODBC within your browser, whether an internal Intranet or on the World Wide Web, requires the Server Edition of QODBC. QuickBooks must be running with the company file opened on the IIS Server machine unless Accessing QuickBooks data remotely via QRemote. There isn't much required to view live QuickBooks Data within your browser. QODBC QRemote Setup (for QODBC v12 onwards) See: Accessing QuickBooks data remotely with QODBC v12 or above using QRemote for more. Note: DCOM & RDS are deprecated and are no more supported. QODBC RDS Setup (for QODBC v9 to v11) See: Accessing QuickBooks data remotely with QODBC v9 to v11 above using RDS for more. QODBC DCOM Server (for an old version of QODBC) See: How to set up QODBC DCOM Server for more. Basic SetupInternet Information Server (IIS) Basic SetupEnsure the following are installed and registered on your web server. 1. Microsoft Internet Information Server (IIS5 or later version) 2. For IIS5 or IIS6 version: Uncheck the Allow IIS to control password setting for Anonymous access in IIS as shown here, and set your password.
OR For IIS7 or later version: IIS7 retired the "Allow IIS to Control Password" and introduced a built-in IUSR account for anonymous authentication. So no additional configuration is needed if you are using IIS7 or later. 3. A supported version of QuickBooks installed with your company file open (set the company file to Multi-user Mode) 4. The QODBC Driver for QuickBooks installed and running in Server Edition mode (either as a 30-Day Server Evaluation or as a fully registered copy). 5. By default, the DSN (data source name) QuickBooks Data QRemote is created for you when QODBC is installed, but you can use any system DSN designed for QRemote. 6. If running ASP.NET, ensure the.NET framework is loaded and patched to the current release level. Also, verify that MDAC 2.6 or greater is installed. Process of Viewing Data in the Web BrowserSetting up "Auto-Login" Unattended ModeLocate a specified Company file 1. Locate the QODBC Driver for the QuickBooks program group from Start >> All Programs. Click on the QODBC Setup Screen icon to launch the setup program supplied with QODBC.
2. The following "General" tab will become available. Check the Locate a company file: option. This allows you to set up the full path to where your QuickBooks data file resides. For example: “C:\Users\Public\Documents\Intuit\QuickBooks\Sample Company Files\QuickBooks Enterprise Solutions 17.0\sample_product-based business.qbw”.
The Browse button will let you choose your QuickBooks company file from the folder where the company file is placed.
Note: To use the QODBC auto-login unattended mode, specify the full path of the QuickBooks company file you wish to connect.
Advanced Setting The Advanced tab has a default option for Integrated Application Authorization popup settings. Use these settings to allow "auto-login" without a visible QuickBooks User Interface. And then, click on the OK button to save the DSN configuration.
Now use this DSN in QRemote Client as "Remote DSN."
Authorize QODBC to log in to QuickBooks Automatically 1. You must also authorize QODBC to log in to QuickBooks automatically. To do this, you must log in to the QuickBooks company file as an Admin user. Go to the Edit -> Preferences menu item in QuickBooks. Then select the Integrated Applications icon from the left and chooseoses -> the Company Preferences tab.
2. Then highlight one application (usually FLEXquarters QODBC) and press the Properties button. Check the Allow this application to access this company file. And check the Allow this application to log in automatically and select a user from the Login As drop-down. You will need to repeat this for all the applications on the list that you use.
Test of Viewing Data within the BrowserYou're ready to use QODBC within your browser, but you will need a web page to test first! You can download the following example by clicking here: DisplaySQL.zip. For IIS5 or IIS6 version: 1. Open the zip file and extract DisplaySQL.asp. Save the file on your Local Disk in the Inetpub\wwwroot folder as shown here:
2. Launch your Browser (Please make sure that QuickBooks is currently running on your computer with your company file open) and run the example by entering the following URL in your browser: http://localhost/DisplaySQL.asp The following should be displayed in your browser (with your data):
OR For IIS7 or later version: 1. Open the zip file and extract DisplaySQL.aspx. Save the file on your Local Disk in the Inetpub\wwwroot folder as shown here:
2. Launch your Browser (Please make sure that QuickBooks is currently running on your computer with your company file open) and run the example by entering the following URL in your browser: http://localhost/DisplaySQL.aspx The following should be displayed in your browser (with your data):
Further examples of how to create invoices, purchase orders, payments, credits, etc., can be found directly on our webpage. QODBC also supports displaying all the QuickBooks Reports through the ODBC Interface. See: How to use the QuickBooks Reporting Engine with QODBC. | |
|
|