


|
[QODBC-Desktop] How to create Link Server with MS SQL 2005/2008
Posted by Juliet (QODBC Support) on 27 November 2009 07:57 AM
|
|
|
Note: DCom component is deprecated. As an alternative to DCom, you can use QRemote. Please refer articles for more information: How to create a Link Server with MS SQL 2005/2008/2012 32-bit Using QODBC/QRemote How to create a Link Server with MS SQL 2005/2008/2012 64-bit Using QODBC/QRemote System EnvironmentWindow XP Service Pack 2 Window 7 32-bit Window 7 64-bit QuickBooks Enterprise Solutions 9.0 (USA Version) Microsoft SQL Server 2005 Development -32-bit (Microsoft SQL Server 2008 Express)-32-bit QODBC 9.00.00.261 Version
Refer : DCom Option / Server Edition Tab missing in QODBC Setup Tab We recommend using QRemote. For SQL Server 64-bit, Click Here "How to create Link Server with MS SQL 2005/2008/2012 64-bit Using QODBC/QRemote." For SQL Server 32-bit, Click Here "How to create Link Server with MS SQL 2005/2008/2012 32-bit Using QODBC/QRemote." Instruction
Running QODBC as a Linked server requires the Server Edition of QODBC. The QODBC Server Edition includes DCOM servers required to allow QODBC to run as a system service to find the instance of QuickBooks running on the server console. QuickBooks must be running with the company file opened on the system console. To create a linked server with MS SQL 2005/2008, there are three main steps: 1. Create a new QuickBooks Data Source and connect it to QuickBooks. 2. Create a linked server with MS SQL 2005/2008 3. Execute the test query using created link server. [Note: Our test shows that the Link Server failed to be created successfully with the MS SQL Express Edition of MS SQL Server 2005 but works fine with MS SQL Server 2008 Express Edition. And in MS SQL Server 2005 Development or Enterprise version it works fine. ]
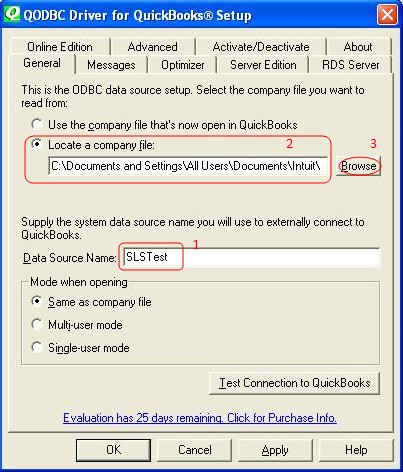
The process of MS SQL 2005 Dev and MS SQL 2008 Express is almost the same. Below we take MS SQL 2005 Dev as an example to show you the steps: Create a new data source and connect to QuickBooksCreate a new QuickBooks Data Source1. Run Configure QODBC Data Source Start -> All Programs -> QODBC Driver for use with QuickBooks -> Configure QODBC Data source 2. Add a new system DSN with QODBC Driver for QuickBooks 3. Configure the source company file Now the QODBC setup screen will become available. First, name this new DSN as 'SLSTest.' Then select Locate a company file option. This allows you to set up the full path to where your QuickBooks data file resides. For example: “C:\Program Files\Intuit\QuickBooks Pro\Myapp.qbw”. [Note: To use the QODBC auto-login unattended mode, you must specify the full path of the QuickBooks company file you wish to connect to.] The Browse button will let you choose your QuickBooks company file from its folder. 4. Configure the QODBC basic setup for using DCOM Server You must turn on the use of the DCOM servers. You do this by running the QODBC Setup Screen and selecting the Server Edition tab page. Check the checkbox for Use DCOM Servers. If you're working with the QuickBooks sample company file, this option is available to check even if you do not have a Server Edition license. It will be ignored if you open a standard company file and do not have a QODBC Server Edition or evaluation. [Note: If you cannot update using QODBC as an SQL Linked Server, you can also try checking the Simulate Transaction Support for SQL Server in the QODBC Setup Screen Advanced Tab Page - The option is not to support Transactions. This is a global driver setting. Checking this box will turn transaction support on so that Microsoft SQL Server will allow updates when using QODBC as a linked server. QODBC doesn't support transactions. It simply simulates the turning on and off of transactions. ] Automatic DCOM Configuration Click here: qodbcSetDCOM.zip to download the following automated tools. Dcpinst.exe is an installation setup for the automated DCOM configuration object. This needs to be run first and only once. QODBCSetDCOM.VBS is a VB script that uses the installed configuration object to set up the DCOM Servers. It will reset and automatically add all necessary security each time it is run. The script can be edited if you need to change the Accounts it is configuring. The new settings will not take effect until the DCOM servers ( qbXMLRPeQODBCInteractive.exe and qbXMLRP2eQODBCInteractive.exe ) are removed from memory. Rebooting is the simplest way to accomplish this, but running the Windows Task Manager and Ending Process on any copies will also work. Test your DCOM setup using one of the following: IIS users download: TestDCOM.ASP PHP users download: TestDCOM.PHP Cold Fusion users download TestDCOM.CFM
5. Configure the Optimizer Setup of QODBC Select the Dirty Reads option and check to Optimize data after an Insert or Update at the same time (or select the Real Time option and check to Optimize data after an Insert or Update at the same time). These setups relateexecutingn to an UPDATE query using a linked server. This article will record more details belowicle. Test Connection to QuickBooks1. Test Connection to QuickBooks After Applying all settings of the new DSN, press the Test Connection to QuickBooks button. [Note: QuickBooks must be run before and start as Administrator.] 2. Application Certificate The first time you connect to QuickBooks using the new created DSN, you need to finish the application certificate process like below: 3. Authorize QODBC to log in to QuickBooks automatically To do this, you must start QuickBooks as the Administrator. Go to the Edit -> Preferences menu item in QuickBooks. Then select Integrated Applications from the left side. Select the Company Preferences tab, highlight one application (usually FLEXquarters QODBC), and press the Properties button. Check Allow this application to read and modify this company file and Allow this application to login automatically. And you will need to repeat this for all the applications on the list that you use. 4. Exit QuickBooks
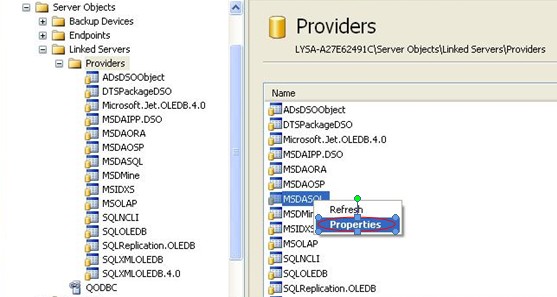
Create Link Server with MS SQL 2005/2008Run MS SQL 2005 Dev / 2008 Express and Login inRun SQL Server Management Studio. You'd better choose SQL Server Authentication and input the correct name and password. Create Link Server1. When connecting successfully, select Server Objects -> Linked Servers, right-click, and select New Linked Server... 2. The following screenshot below shows the general settings of a simple Link Server setup for QODBC. The data source SLSTest has been created before. 3. The basic security settings 4. The basic Server settings. Press OK after applying all settings. 5. Configure MSDASQL (Microsoft OLE DB Provider for ODBC Drivers)
The dynamic parameter should be checked to allow parameter queries. Level zero only should be checked to allow four-part naming to work. Allow InProcess should be checked to help performance. Non-transacted updates should be checked if you want to be able to update QuickBooks data. Index as access path should be checked to help performance. Disallow Adhoc accesses should be unchecked to allow OPENQUERY to function. Now you can see the QODBC link server displayed on the left side.
Execute Test Query using created link serverExecute Test Query1. Press New Query in MS SQL Server Management Studio Express, input the test query on the right side, and then click Execute button. 2. The query results are displayed as follows: Some examples are based on a Link Server named QODBCSELECT * FROM OPENQUERY(QODBC, 'SELECT * FROM Host') SELECT * FROM QODBC...HOST SELECT * FROM OPENQUERY(QODBC, 'SELECT * FROM HostSupportedVersions') SELECT * FROM QODBC...HostSupportedVersions SELECT * FROM OPENQUERY(QODBC, 'SELECT ListID, Name FROM Employee') SELECT ListID, Name FROM QODBC...Employee SELECT * FROM OPENQUERY(QODBC, 'SELECT ListID, Name FROM Customer') SELECT ListID, Name FROM QODBC...Customer SELECT * FROM OPENQUERY(QODBC, 'SELECT ListID, Name, CompanyName FROM Vendor') SELECT ListID, Name, CompanyName FROM QODBC...Vendor SELECT * FROM OPENQUERY(QODBC, 'SELECT Name, CompanyName FROM Vendor Where "Name" =''Bayshore Water''') SELECT * FROM OPENQUERY(QODBC, 'sp_report CheckDetail show TxnType_Title, RefNumber_Title,Date_Title, Name_Title, Item_Title, Account_Title, PaidAmount_Title, OriginalAmount_Title, TxnType, RefNumber, Date, Name, Item, Account, PaidAmount, OriginalAmount parameters DateMacro = ''ThisMonthToDate''') UPDATE OPENQUERY(QODBC, 'SELECT "Name", "CompanyName" FROM Vendor WHERE "Name" = ''Bayshore Water''') SET "CompanyName" = 'Bayshore Water, LLC' UPDATE QODBC...Vendor SET "CompanyName" = 'Bayshore Water, LLC' WHERE "Name" = 'Bayshore Water' INSERT INTO QODBC...Customer (Name) Values ('Test Customer 201') Different UPDATE queries with Different QODBC Setup SettingsThere are two ways to UPDATE data as below: (1) Using OPENQUERY: UPDATE OPENQUERY(QODBC, 'SELECT "Name", "CompanyName" FROM Vendor WHERE "Name" = ''Bayshore Water''') SET "CompanyName" = 'Bayshore Water, LLC' (2) Update directly: UPDATE QODBC...Vendor SET "CompanyName" = 'Bayshore Water, LLC' WHERE "Name" = 'Bayshore Water' With the QODBC Optimizer Setup: Select the Dirty Reads option or Real Time option (which performs slower than Dirty Reads) and check to Optimize data after an Insert or Update. Both kinds of UPDATE queries can execute successfully. With the QODBC Optimizer Setup: Select the Null option and uncheck Optimize data after an Insert or Update. Only the OPENQUERY Update can execute correctly. About MS SQL Server Services Run as the Build-in System AccountThe MS SQL Server services running as the built-in system account is strongly suggested when you configure your Properties settings about SQL Server. During our test, the link server sometimes failed to work when logging on as a specified user account. To configure the built-in system account settings, please follow the steps below: 1. Start -> Run -> Input the following command: %SystemRoot%\system32\services.msc /s to start MS SQL Services. 2. Double-click SQL Server (MSSQLSERVER) 3. Select the Log On Tab, select the Local System account option, and press Apply to finish the configuration. Troubleshooting QODBC as a SQL Linked serverBelow is an SQL script that will test the DCOM Server setup. All components should have a "Successfully Created" description when everything is configured correctly. Follow the instructions on this website for the Web Server Edition if you have difficulty with DCOM configuration. Test DCOM Script (.vbs) DECLARE @oQBXMLrp int | |
|
|


I would like to inform you that there is no physical database attached in SQL Linked Server. There is only link between QuickBooks Data & SQL Server via QODBC. So you cannot take backup of Linked Server.
I would like to inform you that when QODBC is installed on a new machine it starts with 30 day evaluation (All features are active). But QODBC evaluation version will turn to Read Only edition for QuickBooks enterprise edition – automatically after 30 days (If QuickBooks Enterprise Edition v10 or above is installed). So you can use QODBC as readonly with QuickBooks Enterprise edition.
QODBC Read-only edition for QuickBooks Enterprise does not include QRemote License. So after 30 days, you may not be able to use QRemote, I would suggest you to purchase a latest QODBC license to see if it can solve the issue.
After 30 days if you try to connect and using QuickBooks Other then Enterprise edition ( ie. Pro/Premier ) you will notice "Evaluation Expired" message.
After 30 days if you try to connect and using QRemote Other then QODBC Licensed you will notice "Unable to open license file" message.