|
[QODBC-Desktop] How to Connect to QuickBooks for the First Time
Posted by Michael (QODBC Support) on 29 April 2009 09:37 AM
|
|
How to connect QODBC to QuickBooks for the First TimeStart QuickBooks before using QODBCOnce the FLEXquarters QODBC Driver for QuickBooks has been successfully installed on your computer, you can begin to use it immediately using the FREE "once-off" 30-Day QODBC Server Edition Evaluation mode.
Note: QuickBooks application and QODBC Test tool should be launched typically. Do not start the application as "Run as Administrator." Both applications should be running under the same Windows User context (Elevated=No)
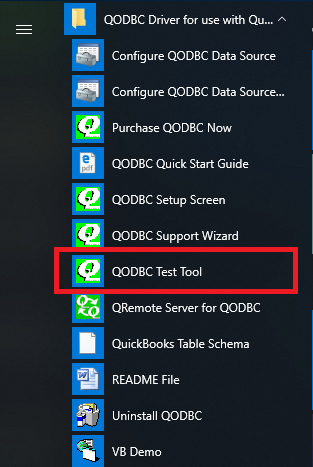
If Close QuickBooks and start QuickBooks usually. The QuickBooks application is "Run as Administrator" (Elevated=Yes). CloQuickBooks by default runs in Elevated Mode = Yes, then make sure Windows UAC is set to "Default" level, check QuickBooks application shortcut properties, and remove "Run as Administrator." Restart the machine and start the QuickBooks application again. Running QODBC Test ToolLeaving your QuickBooks company to file open, click on Start --> Programs --> QODBC Driver for QuickBooks -->QODBC Test Tool or QODBC 32-Bit Test Tool.
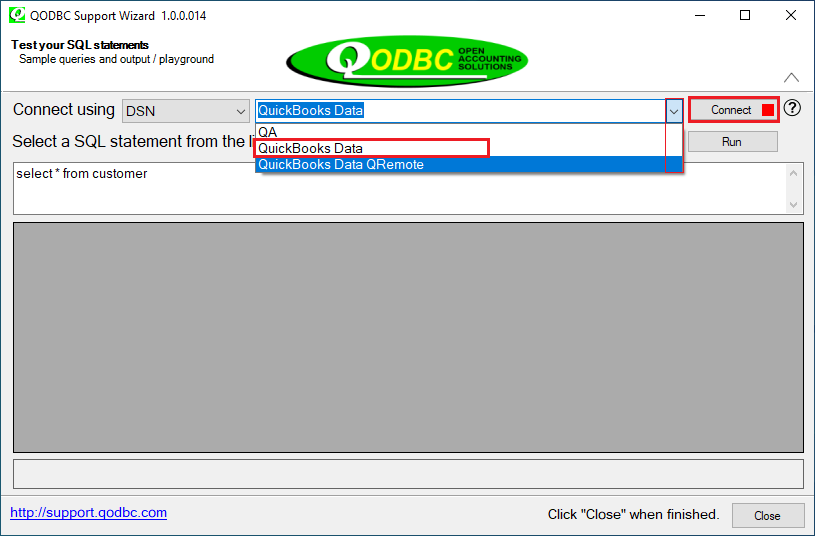
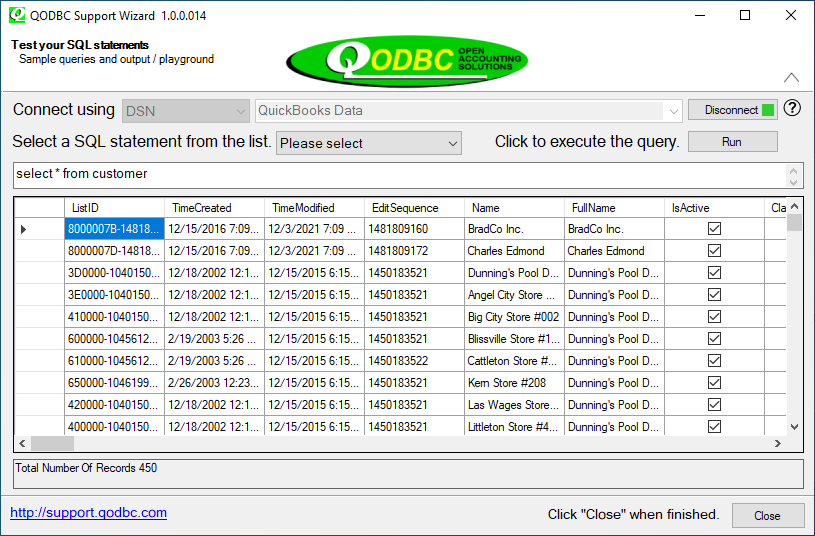
Click on the "QODBC Test Tool" or "QODBC 32-Bit Test Tool" icon to launch the program supplied with QODBC. To establish a connection, select the "QuickBooks Data" DSN from the dropdown list, and Click on "Connect."
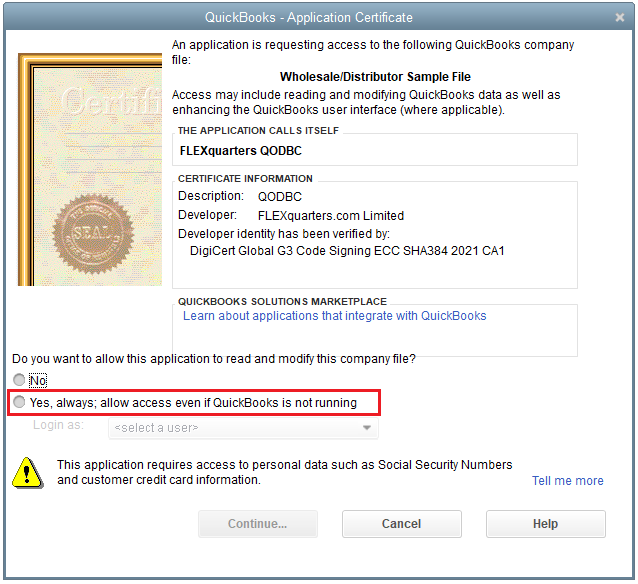
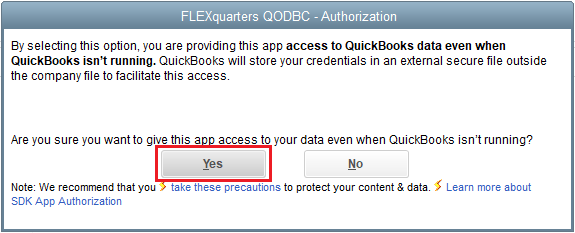
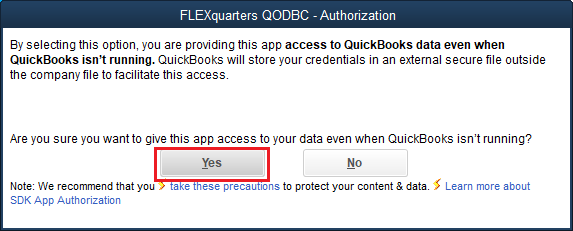
When the driver starts, QuickBooks will ask permission for the driver to access your QuickBooks data. Answer "Yes, Always" to this, and the QODBC driver is added to the Integrated Application list. This will allow applications to integrate with QuickBooks data when QuickBooks is running on the desktop. There may be instances in which you want an integrated application designed to share data with QuickBooks to access QuickBooks files automatically, without user intervention. This might permit, for example, a particular application to run during the night when there is no other activity on the company file. Also, QuickBooks need not be running on the desktop for ODBC-compliant applications to access the data files while set in this mode because QODBC will start it up in background/hidden mode. Choose "Yes, always; allow access even if QuickBooks is not running."
Click on the "Yes" button.
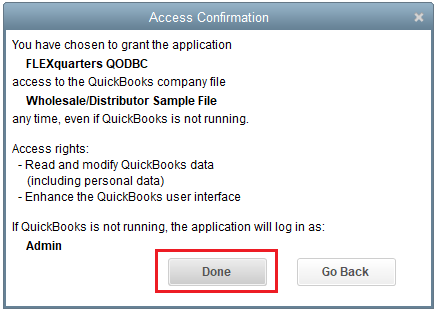
If you have multiple users configured in the QuickBooks company file, you may choose the QuickBooks user to be used for auto login. Please select a user with sufficient permission or may choose "Admin."
Click on the button "Done."
This will connect you to the current company file opened by QuickBooks after you click Connect.
Now that you have successfully established a connection to your QuickBooks data, it's time to type in your desired SQL query. For example, you can use the default "SELECT * FROM CUSTOMER" or type in another table like stock by entering "SELECT * FROM ITEM INVENTORY." Click the "Run" button, and the requested query results will appear! In case you're wondering, the * in the select statement means all columns in that Table.
To disconnect, Click the "Disconnect" button.
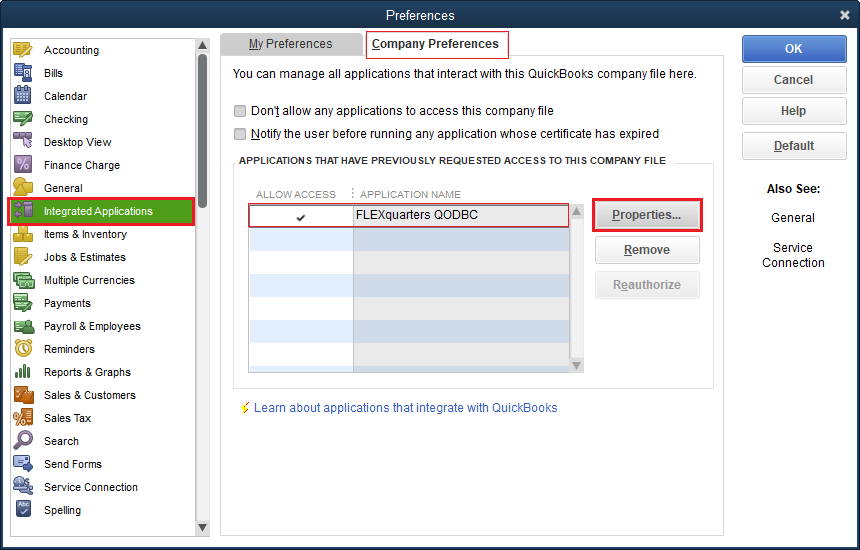
Allowing applications to log in automatically.From the QuickBooks Edit menu, select Preferences, and then select Integrated Applications. There are often instances in which you want an integrated application designed to share data with QuickBooks to access QuickBooks files automatically, without user intervention. This might permit, for example, a particular application to run during the night when there is no other activity in the company file. Also, QuickBooks doesn't need to be running in the foreground for ODBC-compliant applications to access the data files using QODBC while setting in this mode.
Click the Company Preferences tab and make sure that the Don't allow any applications to access this company file checkbox isn't checked.
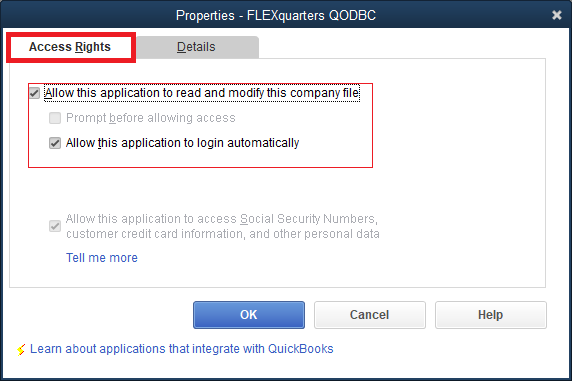
Make sure to allow this application to read and modify this company file. This procedure needs only be done once for each QODBC application to be able to connect with the QuickBooks data from any other ODBC-compliant application in the future. To change any of these options, from the QuickBooks Edit menu, select Preferences, and then select Integrated Applications. If you have already configured an auto-login user and wish to change the associated user, you may choose a QuickBooks user from the list.
Check "Allow this application to access this company file." Uncheck "Prompt before Allowing Access." Check "Allow this application to log in automatically." Check "Allow this application to access Social Security Numbers, cc information, and other personal data if appropriate. This procedure needs only be done once for QODBC to be able to connect with the QuickBooks data from any other ODBC compliant application in the future. Additionally, if you plan to modify the files, you must choose "Multi-User Mode" from the Files menu in QuickBooks to allow this.
Testing Your Connection.After making any changes to the integrated application, please test the connection again.
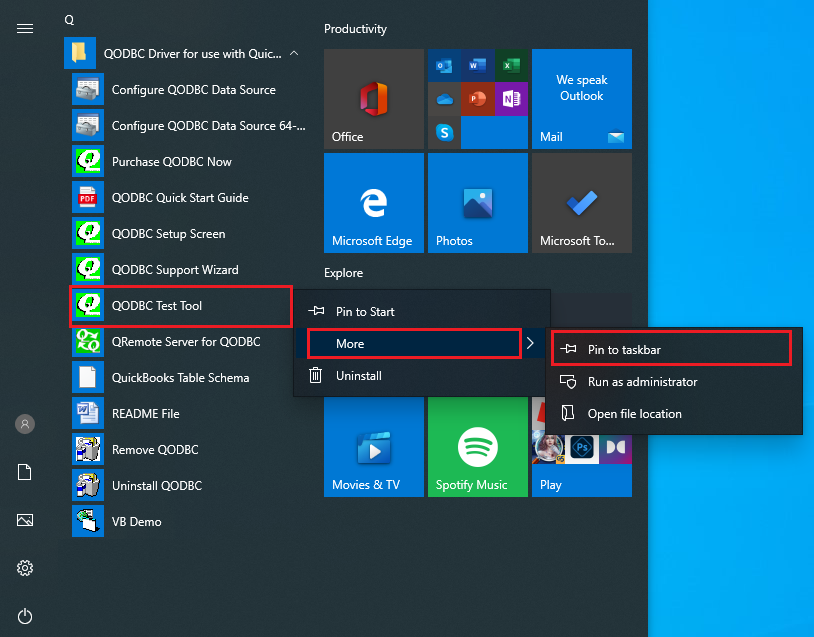
Add QODBC Test tool to Taskbar.You may right-click on the QODBC Test Tool -->>More-->> Pin to the Taskbar to create a QODBC Test Tool shortcut on the Taskbar, then you can start it by clicking the shortcut only.
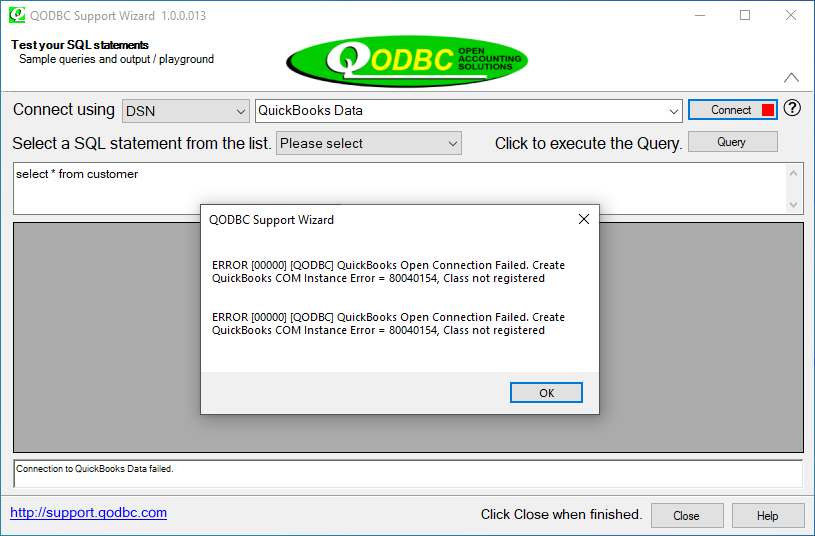
Troubleshooting Your ConnectionTrouble1Problem Description If you receive a QB Open Connection Failed error 80040154 like this:
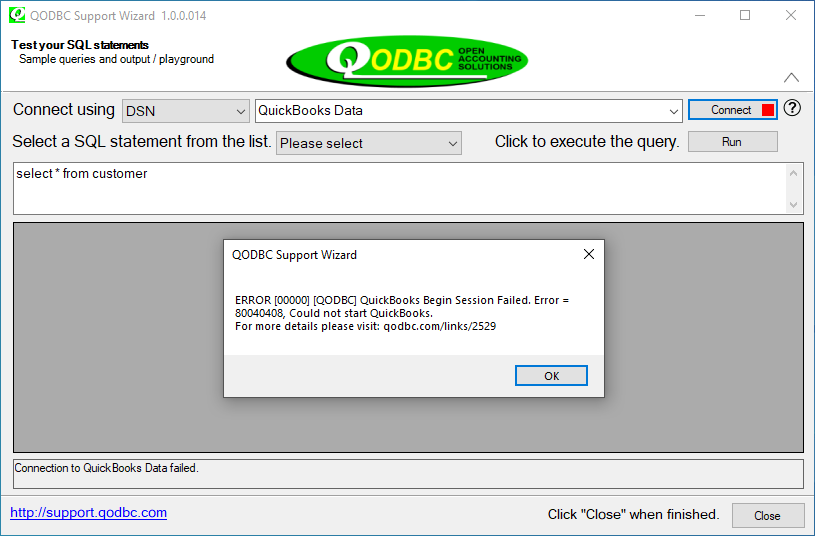
Solutions Before connecting to QuickBooks, you should check whether QuickBooks is already installed on your computer. If not, please install QuickBooks first, start QuickBooks before using QODBC, then try to connect it again. Or please see Troubleshooting: Begin Session Failed Error=80040154 for more. Trouble2Problem Description If you receive a QuickBooks Begin Session Failed. Error = 80040408, Could not start QuickBooks.
Solutions Before connecting to QuickBooks, you should check whether your QuickBooks is running. If it is not running or not opening successfully, please check the reason and make sure it is running, then try to connect it again. QuickBooks application and QODBC Test tool should usually be launched. Do not start the application as "Run as Administrator." Please verify Windows "User Account Control" Settings is set to the default value.
Suppose you have configured QODBC auto login or specified the QuickBooks company file path in the QODBC Driver DSN. Please change it to "Use the company file now open in QuickBooks" and try connecting again.
Trouble3Problem Description If you receive a QB Begin Session Failed error 80040430 | 80040401d | 80040401a like this:
Solutions You must authorize QODBC to log into QuickBooks automatically. QuickBooks integrated application certificate must be accepted for each application separately. For example, If you are using QODBC Test Tool, MS Excel, and Crystal reports. It would help if you authorized QODBC to connect to QuickBooks for all three applications. To do this, you must restart QuickBooks, log in to the company file as QuickBooks user "Admin," and connect using QODBC Test Tool, MS Excel, and Crystal reports. Or please see Troubleshooting: Begin Session Failed. Error = 8004041d, 80040418, 8004041a, 80040430 for more.
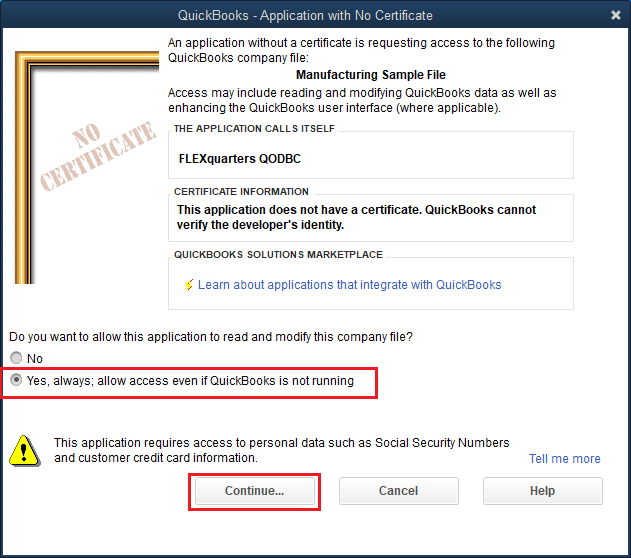
Trouble4Problem Description When I try to connect using my application, I get "Application with no certificate":
Solutions QODBC does have a digital certificate (right-click on fqqb32.dll/properties in the Windows>System 32 Directory). Still, since your application is trying to access QuickBooks through QODBC and your application does not have a valid digital signature (your application is not signed digitally), QuickBooks will generate the "Application with No Certificate" popup. It is not mandatory to sign your application. You may continue using QODBC and accept the integrated application certificate. Please refer to the below section. QuickBooks Integrated Applications with No Certificate When QODBC starts, QuickBooks will ask you permission for this driver to access your QuickBooks data. Check the Yes, always allow access even if QuickBooks is not running options and Click Continue to this, and the QODBC driver is added to the Integrated Application list.
Note: QODBC has a digital certificate (right-click on fqqb32.dll/properties in the Windows>System 32 Directory), but another application is trying to access QuickBooks through QODBC, and QuickBooks does not know what the application is. It generates that message. Confirm that you want to allow this access by clicking on Yes. This will enable applications to integrate with QuickBooks data when QuickBooks is running on the desktop.
Check the information. If it's right for you, please click the Done button. If it's wrong for you, please click Go Back.
Connection Related Knowledge Base Articles
You can also see: How to set up QODBC for Auto-login into QuickBooks for more details. For troubleshooting connection issues, refer: To how to use QODBC Support Wizard See also: VB Demo is missing Videos: Connecting QODBC Driver to QuickBooks for the First Time (Video) How to set up QODBC Driver to auto-connect to QuickBooks. (Video)
Tags: QuickBooks First time, QODBC First step, QuickBooks startup, Connect QuickBooks, how to use qodbc | |
|
|