|
[QODBC-Desktop] How to create Link Server with MS SQL 2000
Posted by Juliet (QODBC Support) on 09 April 2010 07:38 AM
|
|
System EnvironmentWindow XP Service Pack 2 QuickBooks Enterprise Solutions 9.0 (USA Version) Microsoft SQL Server 2000 Personal Edition QODBC 9.00.00.261 Version
For SQL Server 64-bit, Click Here "How to create Link Server with MS SQL 2005/2008/2012 64-bit Using QODBC/QRemote." For SQL Server 32-bit, Click Here "How to create Link Server with MS SQL 2005/2008/2012 32-bit Using QODBC/QRemote." InstructionsRunning QODBC as a Linked server requires the Server Edition of QODBC. The QODBC Server Edition includes DCOM servers required to allow QODBC to run as a system service to find the instance of QuickBooks running on the server console. QuickBooks must be running with the company file opened on the system console. Two Choices Setting up Linked Table with MS SQL ServerYou have two choices in setting up QODBC Linked Tables with Microsoft SQL Server. The first is using the QODBC DCOM Servers. The second is using the Remote Connector Option. DCOM Servers Also refer : DCom Option / Server Edition Tab missing in QODBC Setup Tab Remote Connector Option The Remote Connector option allows the window that is running QuickBooks to be anywhere that is accessible via TCP/IP. That means QuickBooks can be run in a Terminal Sessions window, on another computer on your LAN, or anywhere on the WEB. If your data are transmitted over the internet, we recommend you upgrade the Remote Connector to the SSL secure version. The instructions on setting up the Remote Connector version are found in How to use Remote Connector. Main Steps to Creating Link Server with MS SQL 2000To create a linked server with MS SQL 2000, there are three main steps: 1. Create a new QuickBooks Data Source and connect it to QuickBooks. 2. Create a linked server with MS SQL 2000 3. Execute the test query using created link server. [ Note: Our test shows that the Link Server failed to be created successfully with the MS SQL Express Edition. But in MS SQL Server 2000 Personal Edition, it works fine. ] Create a new data source and connect to QuickBooksCreate a new QuickBooks Data Source1. Run ODBC Data Source Administrator via: Start -> All Programs -> QODBC Driver for use with QuickBooks -> Configure QODBC Data source
2. Click Add... button to add a new system DSN with QODBC Driver for QuickBooks named "SLSTest."
3. Configure the source company file Now the QODBC setup screen will become available. First, name this new DSN as 'SLSTest.' Then select Locate a company file option. This allows you to set up the full path to where your QuickBooks data file resides. For example: “C:\Program Files\Intuit\QuickBooks Pro\Myapp.qbw”. [ Note: To use the QODBC auto-login unattended mode, you must specify the full path of the QuickBooks company file you wish to connect to.]
The Browse button will let you choose your QuickBooks company file from its folder.
4. Configure the QODBC basic setup for using DCOM Server You must turn on the use of the DCOM servers. You do this by running the QODBC Setup Screen and selecting the Server Edition tab page. Check the checkbox for Use DCOM Servers.
If you're working with the QuickBooks sample company file, this option is available to check even if you do not have a Server Edition license. It will be ignored if you open a standard company file and do not have a QODBC Server Edition or evaluation. [ Note: If you cannot update using QODBC as an SQL Linked Server, you can also try checking the Simulate Transaction Support for SQL Server in the QODBC Setup Screen Advanced Tab Page - The option is not to support Transactions. This is a global driver setting. Checking this box will turn transaction support on so that Microsoft SQL Server will allow updates when using QODBC as a linked server. QODBC doesn't support transactions. It simply simulates the turning on and off of transactions. ]
5. Configure the Optimizer Setup of QODBC Select the Dirty Reads option and check to Optimize data after an Insert or Update at the same time (or select the Real Time option and check to Optimize data after an Insert or Update at the same time). These setups relate to executing an UPDATE query using a linked server, and more details will be recorded in this article.
Note: A linked server runs queries as multiple threads, and the QODBC optimizer is single-user only. So you need to set up a different optimizer file for the SQL Server to use than the other desktop applications. To do this, set up a separate System DSN (see: How to create or configure a QODBC DSN) and specify a fixed location of the optimizer database folder for SQL Server to use (like C:\Program Files\QODBC Driver for QuickBooks) instead of the default %UserProfile% method. To repair an optimized table (for example, the Invoice table), you can run the following: SELECT * FROM OPENQUERY(QUICKBOOKS, 'SELECT * FROM Invoice VERIFY WHERE TxnID = "x"' ) Another way of doing this is simply logging in to the account under which the SQL Server Agent runs. Bring up the QODBC Setup Screen, and under the OPTIMIZER tab, click Reload all data - at this point, you will have <companyname>.opt file in the folder. Automatic DCOM Configuration Click here: qodbcSetDCOM.zip to download the following automated tools. Dcpinst.exe is an installation setup for the automated DCOM configuration object. This needs to be run first and only once. QODBCSetDCOM.VBS is a VB script that uses the installed configuration object to set up the DCOM Servers. It will reset and automatically add all necessary security each time it is run. The script can be edited if you need to change the Accounts it is configuring. The new settings will not take effect until the DCOM servers ( qbXMLRPeQODBCInteractive.exe and qbXMLRP2eQODBCInteractive.exe ) are removed from memory. Rebooting is the simplest way to accomplish this, but running the Windows Task Manager and Ending Process on any running copies will also work. Test your DCOM setup using one of the following: IIS users download TestDCOM.ASP PHP users download TestDCOM.PHP Cold Fusion users download TestDCOM.CFM Setup Auto-Login Unattended Mode First, set up the OQDBC DSN as listed before, and you will also have to authorize QODBC to log in to QuickBooks automatically. To do this, you must start QuickBooks as the Administrator. Go to the Edit -> Preferences menu item in QuickBooks. Then select the Integrated Applications icon from the left side.
Then highlight one application (usually FLEXquarters QODBC), press the Properties button, and click on the Company tab. Check the Allow this application to access this company file option. And check the Allow this application to lologinutomatically and select a user from the Logins drop-down. You will need to repeat this for all the applications on the list that you use.
Create Link Server with MS SQL 2005Run MS SQL 2000 Personal Edition Enterprise Manager
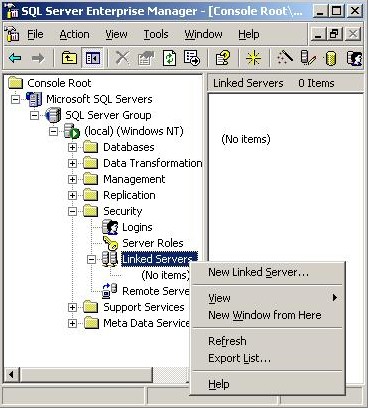
Create Link Server1. Using Enterprise Manager, select your SQL server -> Security -> Linked Servers, then right-click (or Action menu) and select New Linked Server...
2. Now, the screenshot below shows a simple Link Server setup:
Setup Provider Options Before pressing OK, select Provider Options... Dynamic parameters should be checked to allow parameter queries. Level zero only should be checked to allow four-part naming to work. Allow InProcess should be checked to help performance. Non-transacted updates should be checked if you want to be able to update QuickBooks data. Index as access path should be checked to help performance.
Disallow adhoc accesses should be unchecked to allow OPENQUERY to function.
Then Apply all the settings for Provider Options. Setup Security Options Use the default option on security.
Setup Server Options Use the default Server Options.
After finishing, all the setups, press OK to finish.
Test with the Created Link ServerBrowse tables using the link server1. Press the Tables icon on the left side under QODBC brunch.
Application Certificate for the first connection If it is the first time to connect using the newly created link server, QuickBooks must be running with your target company file open. When you click the Tables icon, a Certificate window will pop up. Check Yes, always; allow access even if QuickBooks is not running and Allow this application to access personal data such as Social Security Numbers and customer credit card information. , and then click Continue... and Done as follows:
2. If it succeeds, it will show all table names in QuickBooks.
Running Test Queries in SQL Query Analyzer1. Run SQL Query Analyzer and start SQL Server
2. Execute a SELECT query below for the test: Select * from qodbc...bill The results show the SELECT succeed.
3. Execute an UPDATE with the OPENQUERY query below for the test:
Some examples are based on a Link Server named QODBCSELECT * FROM OPENQUERY(QODBC, 'SELECT * FROM Host') SELECT * FROM QODBC...HOST SELECT * FROM OPENQUERY(QODBC, 'SELECT * FROM HostSupportedVersions') SELECT * FROM QODBC...HostSupportedVersions SELECT * FROM OPENQUERY(QODBC, 'SELECT ListID, Name FROM Employee') SELECT ListID, Name FROM QODBC...Employee SELECT * FROM OPENQUERY(QODBC, 'SELECT ListID, Name FROM Customer') SELECT ListID, Name FROM QODBC...Customer SELECT * FROM OPENQUERY(QODBC, 'SELECT ListID, Name, CompanyName FROM Vendor') SELECT ListID, Name, CompanyName FROM QODBC...Vendor SELECT * FROM OPENQUERY(QODBC, 'SELECT Name, CompanyName FROM Vendor Where "Name" =''Bayshore Water''') SELECT * FROM OPENQUERY(QODBC, 'sp_report CheckDetail show TxnType_Title, RefNumber_Title,Date_Title, Name_Title, Item_Title, Account_Title, PaidAmount_Title, OriginalAmount_Title, TxnType, RefNumber, Date, Name, Item, Account, PaidAmount, OriginalAmount parameters DateMacro = ''ThisMonthToDate''') UPDATE OPENQUERY(QODBC, 'SELECT "Name", "CompanyName" FROM Vendor WHERE "Name" = ''Bayshore Water''') SET "CompanyName" = 'Bayshore Water, LLC' Note: During our test, the UPDATE query using the link server can only work fine with the OPENQUERY tag but failed using the query below: UPDATE QODBC...Vendor SET "CompanyName" = 'Bayshore Water, LLC' WHERE "Name" = 'Bayshore Water' Troubleshooting QODBC as a SQL Linked serverBelow is an SQL script that will test the DCOM Server setup. All components should have a "Successfully Created" description when everything is configured correctly. Follow the instructions on this website for the Web Server Edition if you have difficulty with DCOM configuration. Test DCOM Script (.vbs): DECLARE @oQBXMLrp int | |
|
|