|
[QODBC-ALL] Using QuickBooks Data with Microsoft Access 2016 64-bit
Posted by Jack - QODBC Support on 19 April 2016 10:07 AM
|
|
How to Use QODBC with Microsoft Access 2016 64-bitFor 32-bit, Please refer: To how to Configure QODBC to Work With 32-bit MS Access.Creating a Table in Microsoft Access:Note: Microsoft Access has many uses and will allow you to use your QuickBooks data files similarly to Access databases.
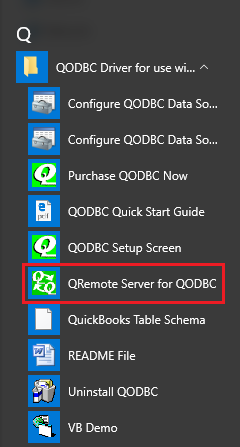
Please make sure QRemote Server is running. You can find the QRemote Server running in System Tray.
If it is not running, then please start QRemote Server from the following: QODBC Online - Start>>All Programs>> QODBC Driver for QuickBooks Online >> QRemote Server for QODBC Online QODBC POS - Start>>All Programs>> QODBC Driver for use with QuickBooks POS >> QRemote Server for QODBC POS
Open MS Access 2016, and make sure you are using the 64-bit version of MS Access from: File->Account->About Access
A default database filename, Database1, appears in the box. You can edit this to a more relevant name, such as QB Link. accdb. Save the file as type "Microsoft Office Access Databases." Then Click "Create" to create a blank desktop database:
In the newly created database, you will find a default blank table. Please close this default table:
You could directly extract QuickBooks records into this table. But in this article, we will show you how to build a linked table to access QuickBooks. Build a connection via the ODBC database button in the External Data menu:
OR Build a connection via External Data -> New Data Source -> From other sources -> ODBC Database :
Under the Get External Data window, you will see two options: Link to the data source by creating a linked table: this option will create a table just like the first option but will keep its link to QuickBooks, which means all your operations to this table will be uploaded to QuickBooks, and the data in the table is also in full sync with QuickBooks.
This article will show you how to build the linked table in MS Access. Build a Linked Table in MS AccessAfter you select the access method and click OK, then you will get a Select Data Source window:
Select the QuickBooks-related DSN you set up with the QODBC driver. This can be one of our pre-installed DSN names or one that you have created. (Here, I choose the default DSN as an example.)
NOTE: QODBC Online users, Please select "QuickBooks Online Data 64-bit" instead of "QuickBooks Data 64-bit QRemote". QODBC POS users, Please choose "QuickBooks POS Data 64-bit" instead of "QuickBooks Data 64-bit QRemote".
The first time you use MS Access to access QuickBooks, it will ask you to grant permission for this application:
Select the "Yes, Always" option, and then click "Done" in the next window:
Once the connection is built, Access will return a list of available tables in the Select Tables window. Please, select the tables you want to extract. Multiple Selection is available.
After the Linking table is successful, you will see linked tables been created in your MS Access file under "Tables":
You can view the property of these linked tables by right-clicking the linked table-> selecting linked table manager:
If you want to view QuickBooks records in this linked table, double-click the attached table, then you will see the records:
Note: If you see ###### in the linked table result, you need to increase the column header size. So you can see the actual result. The linked table is always in sync with QuickBooks Data, so you cannot add or delete any columns in this table. But you can directly modify the data in the linked table, and QODBC will automatically update the modification to QuickBooks. Note: When you run an application that is not entirely ODBC compatible, they often support getting data from Access tables. To make this application work with QuickBooks tables, you can run the Microsoft Access setup, as shown above. Then have this application use the MS Access ODBC driver to talk to the Access database you created, which was linked to QuickBooks tables. This middleware approach allows us to support nearly any application, even if not fully ODBC compliant. Please refer: To how to use MS Access as Middleware with QODBC for using MS Access as Middleware. Suppose you want to import a table in MS Access. In that case, you have to select Import the source data into a new table in the current database option instead of a link to the data source by creating a linked table & repeat the above steps: this option will directly extract tables into Access Database, you can view and edit these tables, but all modification will not be uploaded unless you build another query to do so.
Also, Refer:
Keywords: create odbc connection, Office 2013, Office 365, Excel 365, Access 365, Office 2016, Access 2016, Excel 2016 | |
|
|