|
[QODBC-Desktop] Microsoft Excel 2003 and QODBC
Posted by Rajendra Dewani (QODBC Support) on 12 November 2012 03:46 PM
|
|
|
QODBC and Microsoft Excel Microsoft Excel 2003 and QODBCAlso, Refer:
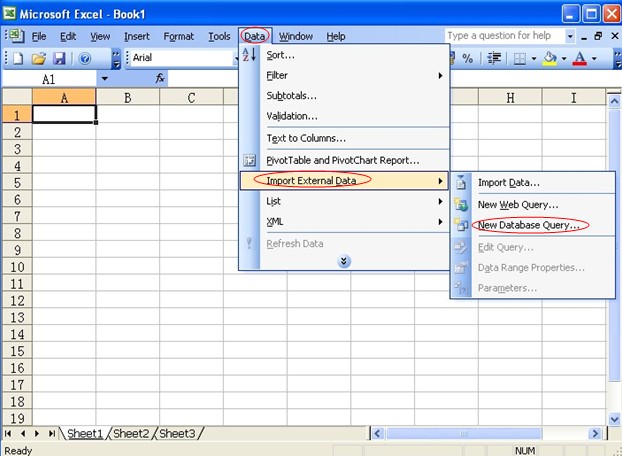
Creating a link to live QuickBooks data in ExcelNote: QODBC allows you to quickly merge live QuickBooks data into the cells of your Microsoft Excel worksheets for quick calculations and graphs. The data will retain a live link to QuickBooks, and one-click will update the data in the worksheet to the most current data in the linked QuickBooks table. Before using Microsoft Excel, you must ensure that the Microsoft Query Add-on is installed. See the Microsoft Office with MS Query and QODBC topic. Select the menu Data -> Import External Data -> New Database Query. Now that the following Data Source screen is available select the Data Source currently opened in QuickBooks and click OK. (Here, I choose the default data source with a sample company file open. And check to Use the Query Wizard to create/edit queries.) Choose the table you wish to import and select the columns from the table to import by pressing the ">" button. (Here, I choose table Customer as a sample.) The following screens allow you to filter and sort the data to be imported, and then you will reach the finish screen. You can return the data to Excel at this point or as in the above screen by selecting Return Data to Microsoft Office Excel. Or edit the data in MS query and apply additional criteria to the QuickBooks record set by selecting View data or edit query in Microsoft Query. (Here, I choose to edit in MS query as an example.) Then click Finish. The desired record set contains only the records with a Name having a value equaling "Residential." Select the field header name and click on it, next select Criteria -> Add Criteria. In the popped-out Add Criteria window, the button specifies the criteria Field as "Name" and Operator as "equals," then click the Value button, and from the list of values, select "Residential" -> OK -> Add. The following screen reflects the applied criteria to the query and the resulting QuickBooks recordset: Select File -> Return Data to Microsoft Office Excel. The following screen will prompt you for the destination of the data: Click OK, and the data will be populated into the existing Excel worksheet. The data from your QuickBooks table is now included in your worksheet and remains connected to the QuickBooks table from which it was imported. Clicking Data -> Refresh Data the
Sample Files: Excel - Customer & Company Tables - Download Excel - Majority of the Tables and Reports - Download | |
|
|