


|
[QODBC-Desktop] How to create Link Server with MS SQL 2005/2008/2012/2016 32-bit Using QODBC/QRemote
Posted by Rajendra Dewani (QODBC Support) on 22 September 2013 12:05 PM
|
|
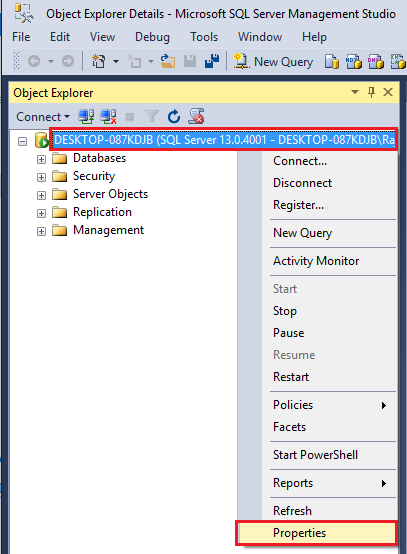
How to create Link Server with MS SQL 2005/2008/2012/2016 32-bit Using QODBC/QRemoteFor 64-bit Refer: How to create Link Server with MS SQL 2005/2008/2012/2016 64-bit Using QODBC/QRemote Start your "SQL Server Management Studio" Login to your SQL Server. On the left-hand side panel, you will find the Server, Right Click on the "SQL Server" and Select Properties.
Please Verify that your SQL Server is 32-bit.
64 and 32-bit words are kept totally separate in the Microsoft Windows Operating System. QuickBooks 2021 and older versions are 32-bit applications, so in order to communicate with it, a 32-bit ODBC driver is required.
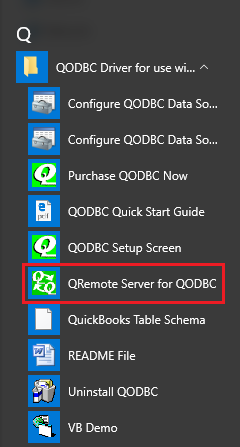
Since a 64-bit application cannot talk to a 32-bit driver, we have to do a bit of magic to get the worlds to connect. We call it QRemote. QRemote also works for 32-bit applications as an alternative to Dcom. As SQL Server is a service-based application, it has to either use Dcom or QRemote. QRemote has two components "QRemote Client Driver for QODBC" and "QRemote Server for QODBC." QRemote Client Driver: Allows 64-bit Applications to connect to QRemote Server and sends the Request to QRemote Server for Processing. QRemote Server: Processes requested instruction from QRemote Client to QuickBooks using QODBC DSN Driver. Start "QRemote Server for QODBC" from the start menu. ( If QRemoteServer is not running )
Double-click the QRemote Server icon from the system tray
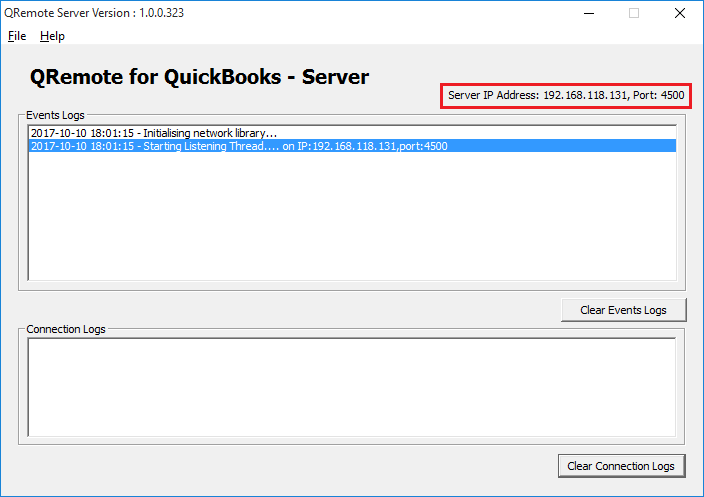
QRemote Server Main screen shows the IP address and Port allowing the QRemote Client to connect.
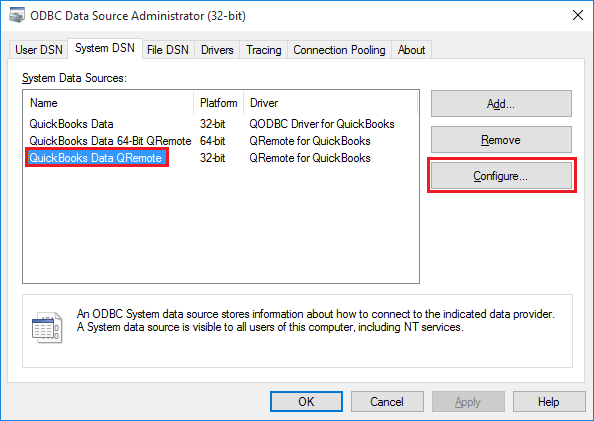
Note the IP address and Port number listed on the QRemote Server "Event Logs window."Create a new DSN entry/or configure the existing oneNavigate to Start Menu, QODBC Drivers for Use with QuickBooks, and click Configure QODBC Data Source
"QuickBooks Data QRemote" is the default DSN created when installing QODBC. (Earlier, it was "QRemote Data 32-bit")
Configure the DSN and provide the IP address and Port as listed under "QRemote Server."
Under the QRemote for QuickBooks – Client DSN configuration screen, Please fill in the following information · Data Source Name: Name of your DSN entry · Server: IP address displayed on QRemote Server · Port: Port displayed on QRemote Server · Encryption Key/Password: (By Default Encryption Key/Password is set to "QODBC#QRemote$1". In case you want to change your Encryption Key/Password, You can configure your encryption key on QRemoteServer and use the same on QRemote Client DSN) · Encryption: (By Default, Encryption is set to Off. In case you want to use encrypted data transfer between QRemote client and QRemoteServer, You can configure encryption on QRemoteServer and use the same on QRemote Client DSN) · Remote DSN: select "QuickBooks Data "DSN from the list. ( Make sure QRemote Server is running) Start Your QuickBooks.
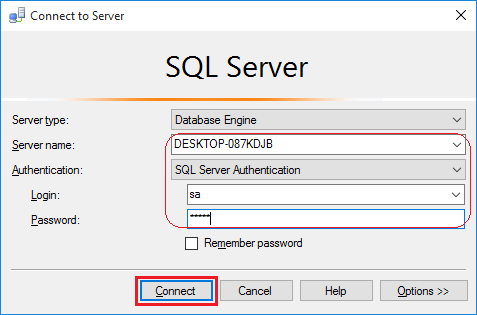
Run MS SQL 2005 Dev / 2008 / 2012 /2016 (32-bit) and log inRun SQL Server Management Studio. You'd better choose SQL Server Authentication and input the correct name and password.
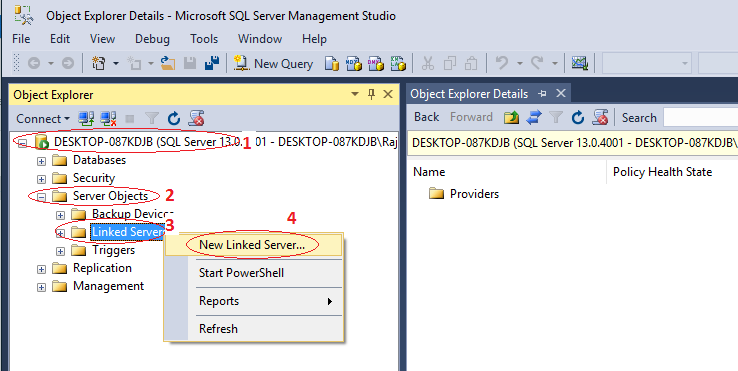
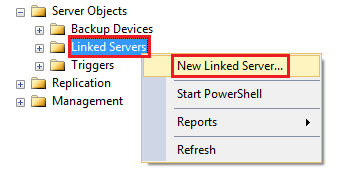
Under SQL Server Management Studio, Navigate to "Server Objects" -> Linked Server -> New Linked Server.
OR
Provide the "New Linked Server" information: Insert your desired Linked Server Name, select provider Microsoft OLE DB Provider for ODBC Drivers from the provider list & insert "QODBC" as the Product name & "QuickBooks Data QRemote" as the Data source & click "OK" button.
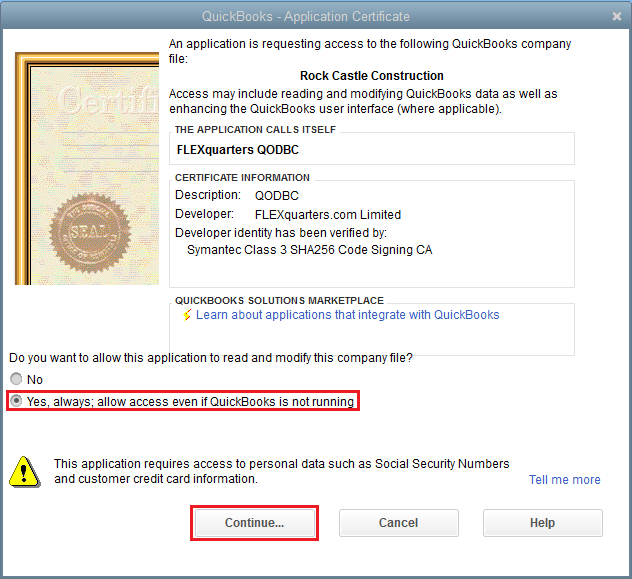
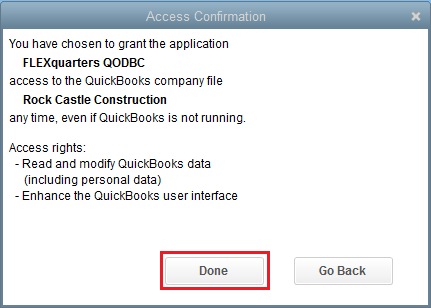
On Clicking OK, it will start establishing a connection to QuickBooks. Please accept the certificate for allowing data access on QuickBooks.
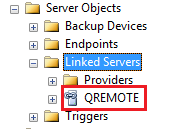
After you have accepted the certificate, the Linked Server will be shown under the "Linked Server" Category.
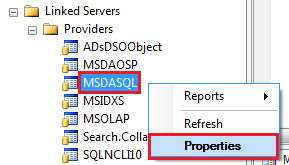
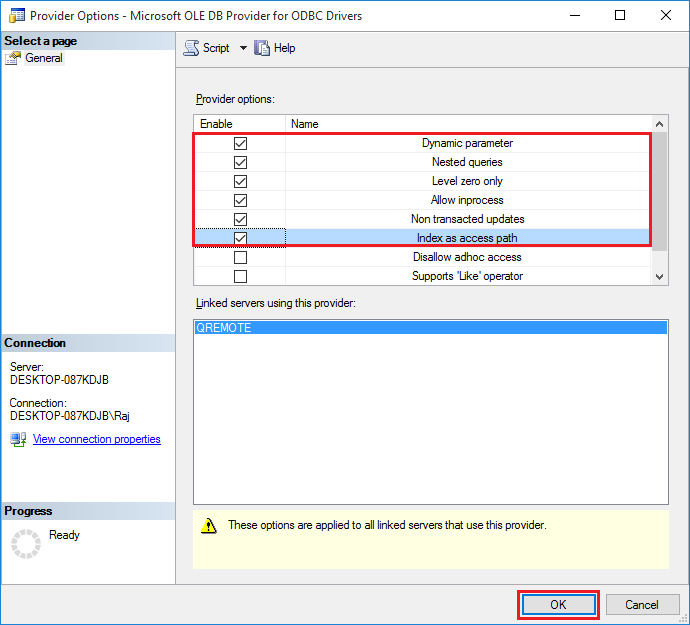
Configure MSDASQL (Microsoft OLE DB Provider for ODBC Drivers)
The dynamic parameter should be checked to allow parameter queries. Level zero only should be limited to allow four-part naming to work. Allow InProcess should be checked to help performance. Non-transacted updates should be checked if you want to be able to update QuickBooks data. Index as access path should be checked to help performance. Disallow Adhoc accesses should be unchecked to allow OPENQUERY to function.
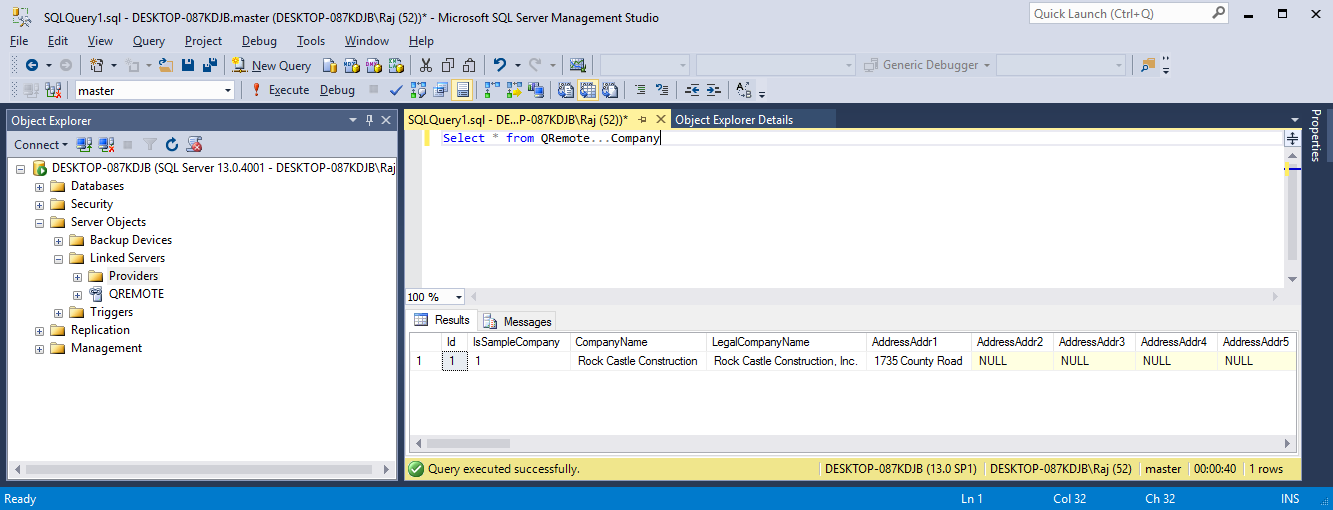
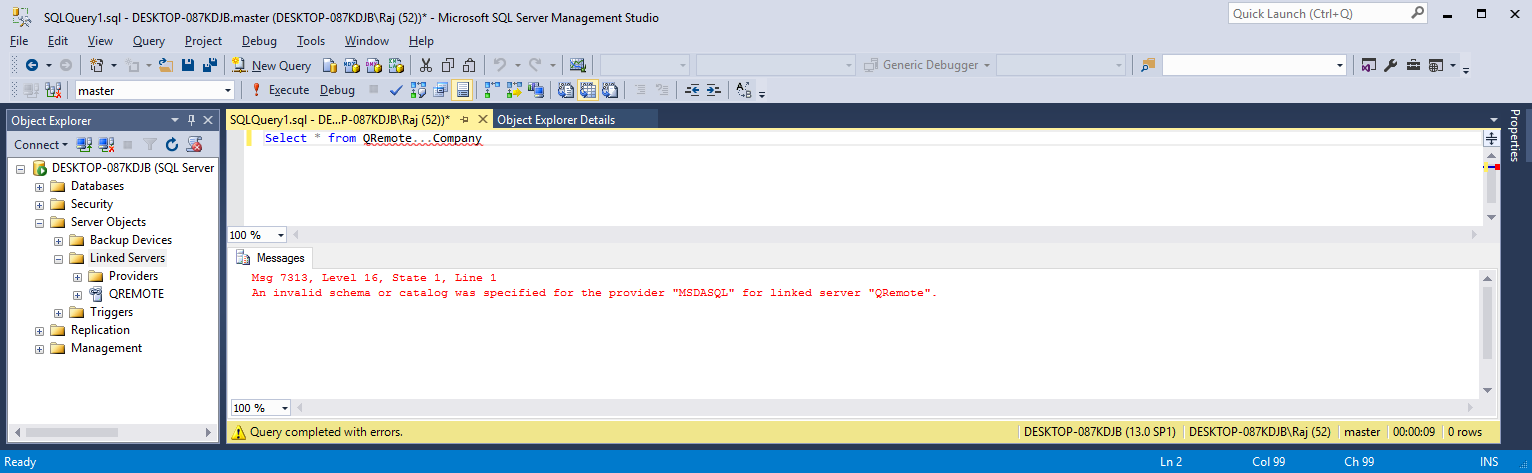
QODBC/QRemote is ready to use with SQL Server/Linked ServerExecute below query Select * from QRemote…Company
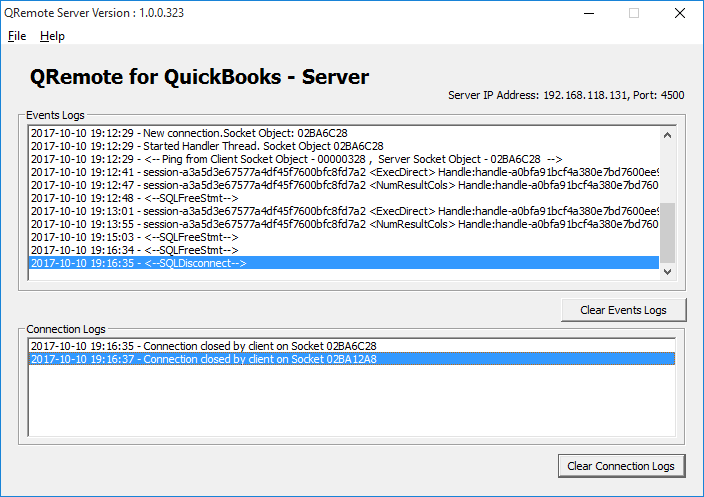
On each query, QRemote Server Logs the events. If you are facing any issues or delays in response, please refer QRemote Server Event Logs for details on which stage it is taking more time.
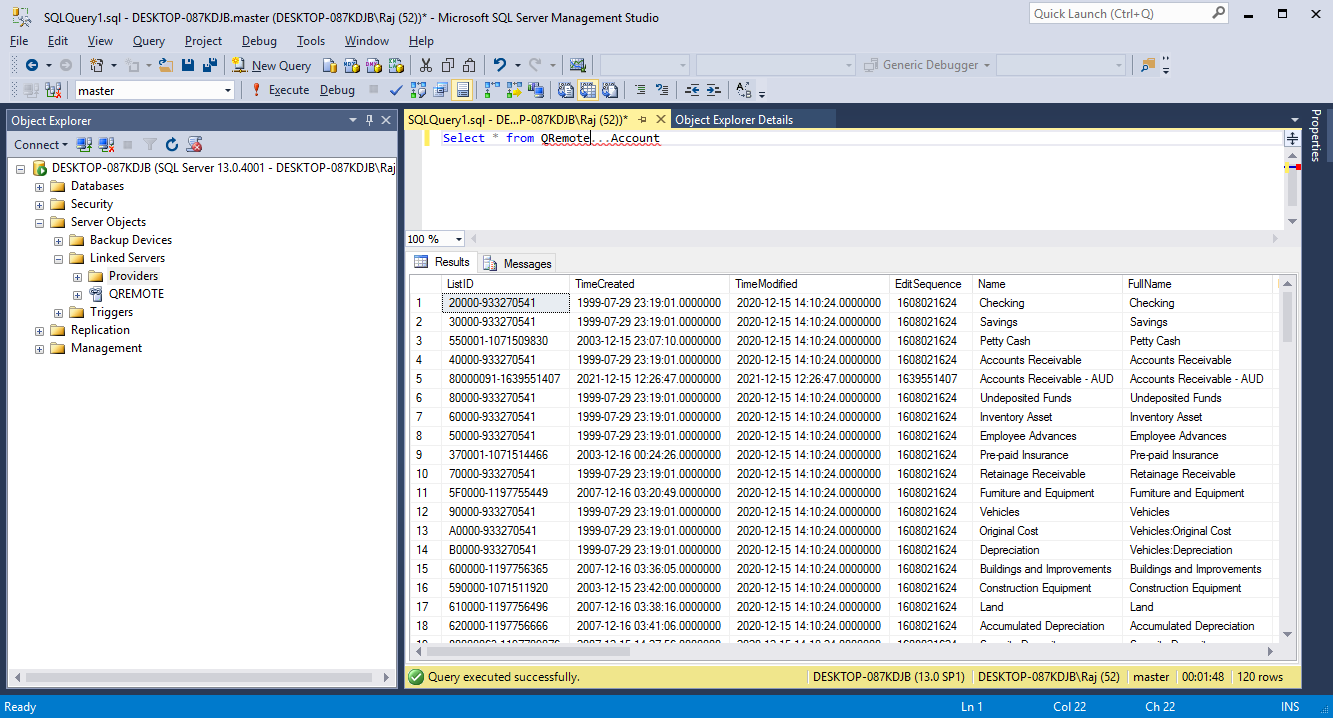
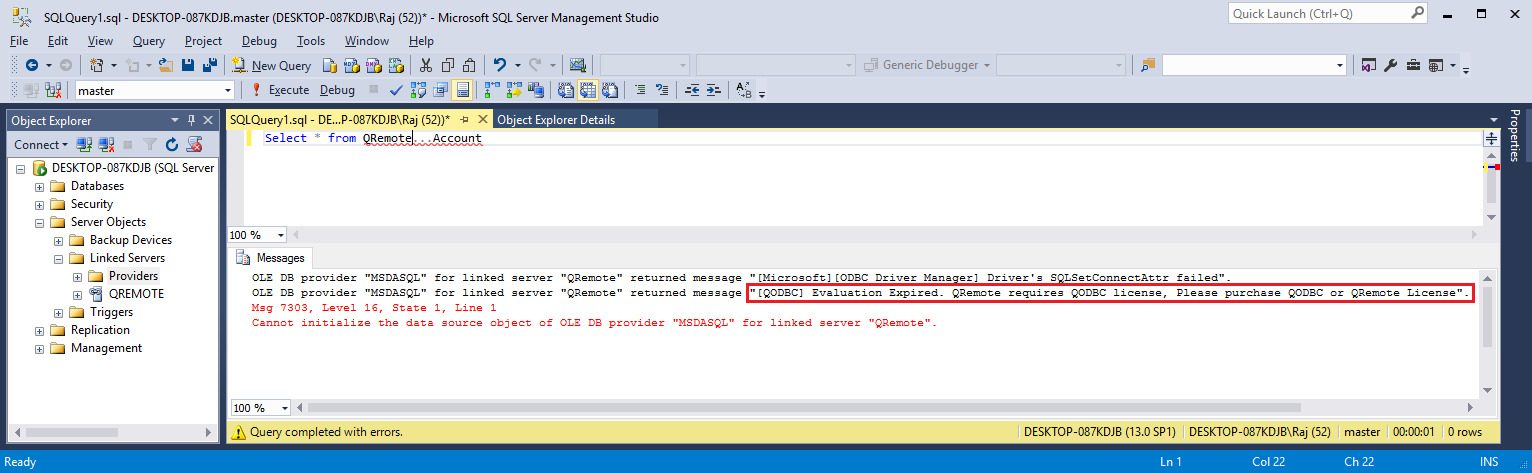
Another Test Select * from QRemote…Account or select * from OpenQuery (QRemote, 'select * from Account') Note: If your SQL statement contains a where clause, use OpenQuery. When using OpenQuery 'where' clause (filters) will be sent to QODBC, and data retrieval will be faster.
On each query, QRemote Server Logs the events. If you are facing any issues or delays in response, please refer QRemote Server Event Logs for details on which stage it is taking more time.
Errors and Solutions"[QODBC] QODBC Server Edition License Required." The QODBC CDKEY License you have activated is not of the Server edition. Please get in touch with our Sales or Support team. http://support.flexquarters.com/esupport/
"[QODBC] Evaluation Expired" You have run out of the 30-day trial/evaluation version. If you still wish to evaluate QODBC, please get in touch with our Sales team.
"QRemote" or "QODBC" contains multiple tables that match the table "TableName." This means you have not configured the "MSDASQL" provider. Please refer above steps and configure the "MSDASQL" provider.
Problem Description:I have the read-only version included in the enterprise product. I can connect from the VB demo and Excel but not from the SQL server (I always cannot open Reckon Accounts). All I want to do is export data to the SQL server. I have made the SQL server process log on as the same windows user as Reckon Accounts and QODBC. I am not running RA, QODBC, or SQL server as a windows administrator, and I have UAC turned on. Often during the query, a box pops up trying to start:
Solution:Please restart your machine & please run Reckon, log in to your company file with Admin user & try to connect using your application. To use DCOM Server & SQL Server with QODBC, you need a QODBC Server Edition license. Please use the QRemote Server instead of the DCOM Server to connect to the SQL Server using QODBC. Please get in touch with your QODBC dealer to purchase the QODBC Server Edition license. For licensing detail, please refer: to QODBC with QRemote Licensing Information Please Refer: Using QuickBooks data with MS SQL Server using QODBC Driver and QRemote (Video) QODBC Reports Architecture Mismatch Problem When connecting Accessing QuickBooks Data Remotely using QODBC & QRemote. (Video) Keywords: encryption, SQL Server 2008 Management Studio, SQL Server 2016 Management Studio, SQL Server 2012 Management Studio, SQL Server Management Studio, SSMS | |
|
|


I would like to inform you that you when the machine using the services likes a webserver, PHP MS SQL Server and connecting to QRemote/QODBC need a server license. If connecting remotely, one which runs such services needs a Server License. Another one there is QRemoteServer running; it needs a QODBC License (could be Read only or Read Write).
For refund/upgrade license related query, I kindly request you to please get in touch with our sales team:
http://www.qodbc.com/contact.htm
The sales team was kind enough to give me a 30 days trial of the server edition. However am not sure if my 30 days trial support read write access because i can now setup the connection from sql server 2013 but i can write data to quick books tables. Please see error below.
OLE DB provider "MSDASQL" for linked server "QODBC" returned message "[QODBC] Not supported".
Msg 7343, Level 16, State 2, Line 1
The OLE DB provider "MSDASQL" for linked server "QODBC" could not INSERT INTO table "[QODBC]...[item]".
I would like to inform you that when QODBC is installed on a new machine it starts with 30 day evaluation All features are active (i.e. Desktop Edition Read/Write, Server Edition Read/Write, QRemote) upon download and no code is required during the first 30 days. The only restriction of the evaluation version is 20 write operations per session. It works in desktop or web/server operation modes during this period. But QODBC evaluation version will turn to Read Only edition for QuickBooks enterprise edition – automatically after 30 days (If QuickBooks Enterprise Edition v10 or above is installed).
QODBC Read-only edition for QuickBooks Enterprise does not include QRemote License. So after 30 days, you may not be able to use QRemote.
I would like to inform you that Item table is read-only table, you cannot insert record in Item table. You can insert record ItemInventory, ItemNonInventory, ItemOtherCharge & on other Item table depend on Item type.
Please refer below mentioned article for add an Inventory Item using QODBC:
http://support.flexquarters.com/esupport/index.php?/Knowledgebase/Article/View/1135/50/how-to-add-an-inventory-item-using-qodbc
If you are still facing issue, I kindly request you to please raise a support ticket to the QODBC Technical Support department from below mentioned link & provide requested information:
http://support.flexquarters.com/esupport/index.php?/Tickets/Submit
can MS SQL Server Management Studio 32bit connect to QuickBooks Data DSN by QODBC Driver without QRemote? If all applications are on the same machine, and both use 32bit, why is QRemote required?
Thank you.
Yes, MS SQL Server Management Studio 32bit can connect to QuickBooks Data DSN by QODBC Driver without QRemote. To use QuickBooks Data DSN in SQL Server you need to setup DCOM Server. You can configure DCOM Server using below mentioned article, after setting up DCOM Server you need to use DSN QuickBooks Data in SQL Server instead of QRemote DSN. Please note this configuration will work only on local machine only.
http://support.flexquarters.com/esupport/index.php?/Default/Knowledgebase/Article/View/2372/0/how-to-setup-qodbc-dcom-server
The specified data source contains an architecture mismatch.
Please refer below mentioned link How to create Link Server with MS SQL 2005/2008/2012 Using QODBC/QRemote:
For 64-Bit SQL Server:
http://support.flexquarters.com/esupport/index.php?/Default/Knowledgebase/Article/View/2458/52/how-to-create-link-server-with-ms-sql-200520082012-64-bit-using-qodbcqremote
And i prepare some reports is the crystal report. How will i suppose to call those reports. Did i have to make an other application, if yes how can i integrate that application with quickbooks and in which language it will be developed
I would like to inform you that when QODBC is installed on a new machine it starts with 30 day evaluation (All features are active). But QODBC evaluation version will turn to Read Only edition for QuickBooks enterprise edition – automatically after 30 days (If QuickBooks Enterprise Edition v10 or above is installed). So you can use QODBC as read only with the QuickBooks Enterprise edition.
When the machine using the services likes a webserver, PHP MS SQL Server and connecting to QRemote/QODBC need a server license. If connecting remotely, one which runs such services needs a Server License.
Your crystal report will work with QODBC read only edition with QuickBooks Enterprise. You don't need server edition license for crystal report.
Please refer : QODBC with QRemote Licensing Information
http://support.flexquarters.com/esupport/index.php?/Knowledgebase/Article/View/2587/45/qodbc-licensing-information
http://support.flexquarters.com/esupport/index.php?/Knowledgebase/Article/View/2568/0/qodbc-with-qremote-licensing-information
TIA!
I would like to inform you that QODBC is not a database tool, but rather a translation tool. QODBC is an ODBC driver (DLL) for QuickBooks Accounting format files. QuickBooks Accounting stores it's data in it's own proprietary DBMS file format. This driver allows users of any ODBC compliant front end application to read and write data contained in QuickBooks Accounting format files similarly to any other ODBC enabled database.
QODBC works by accepting SQL commands from applications through the ODBC interface, then converting those calls to navigational XML commands to the QuickBooks Accounting DBMS and returning record sets that qualify for the query results. This driver is not a Client/Server product, but rather communicates directly with the QuickBooks application as it runs. QuickBooks is a flat file database, and this driver will not change it into a relational database, so keep that in mind when developing with this driver.
QODBC acts as a 'wrapper' around the Intuit SDK so customers can finally get at their QuickBooks data using standard database tools; speeding development time.
Thanks Mike
I would like to inform you that QuickBooks crash is related to QuickBooks. We may not be able to provide much help on the issue. I kindly request you to contact with Intuit to solve the issue.
I would like to inform you that QuickBooks crash is related to QuickBooks. We may not be able to provide much help on the issue. I kindly request you to contact with Intuit to solve the issue.